.webp)
.webp)

Checklist for Planning a Multi-Functional Outdoor Space
August 26, 2026
A backyard project usually goes better when you plan the use, layout, permits, and budget before you pick materials.
If you want an outdoor space that works for dining, lounging, play, pets, or cooking, start with 2–3 top uses and build the plan around them. Then check the yard size, sun, slope, drainage, utilities, permit rules, and contractor scope before work begins. In this San Diego backyard remodeling guide, details like 85–95°F inland heat, 4–5 foot walkways, 10–20% budget backup, and permit limits for items like patio covers and retaining walls can affect both cost and layout.
Before moving forward, keep these points in view:
- Pick the main uses first so the yard does not get overcrowded
- Measure the site and mark doors, slopes, drains, trees, fences, and access gates
- Map clear zones for dining, lounge, play, and walking paths
- Choose surfaces by use and heat, not looks alone
- Plan shade, lighting, gas, and electrical lines early
- Check permits, HOA review, and Coastal Zone rules
- Set a budget by category and keep 10%–20% aside for hidden problems
- Hire a licensed contractor and get a line-item contract in writing
A fast way to think about the project is simple: use first, site second, layout third, permits and pricing last. The rest of the article walks through that order step by step.
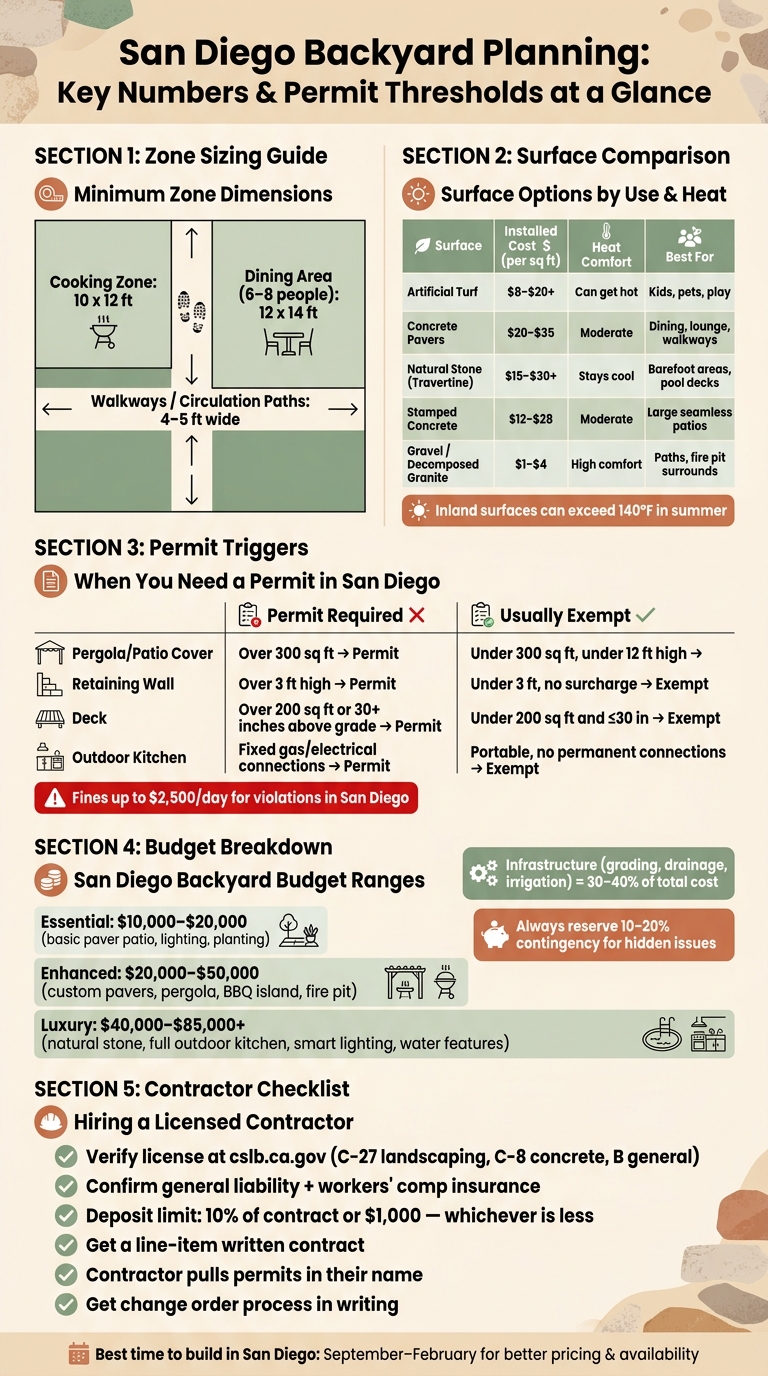
San Diego Backyard Planning: Key Numbers & Permit Thresholds at a Glance
Multi-Functional Backyard Makeover On A Budget | Great Home Ideas
sbb-itb-2b3b7d5
Quick Comparison
| Planning Area | What to Decide | Key Numbers to Know |
|---|---|---|
| Uses | Dining, lounging, play, pets, cooking | Focus on 2–3 priorities |
| Space | Rough zone sizes | Cooking: 10 x 12 ft; dining for 6–8: 12 x 14 ft |
| Paths | Room to move between zones | 4–5 ft wide |
| Heat & Shade | Where sun hits in the afternoon | Inland temps: 85–95°F |
| Surfaces | Pavers, turf, stone, gravel | Some surfaces can top 140°F in summer |
| Turf Limits | How much turf fits the rules | Up to 25% of landscaped area on many new projects over 500 sq ft |
| Permit Triggers | Covers, walls, decks, grading | Patio cover over 300 sq ft; retaining wall over 3 ft |
| Budget | Base work, finishes, backup funds | Drainage/grading can be 30%–40% of total artificial turf costs |
| Contractor Terms | License, insurance, deposit | Deposit limit: 10% or $1,000, whichever is less |
Define How You Want to Use the Space
Start with the job the yard needs to do. Before you pick pavers, turf, or a pergola, decide how you'll actually use the space. A yard built around two or three clear uses tends to work better and takes less effort to keep up than one that tries to squeeze in everything at once.
List Your Top Uses and Priorities
Write down every outdoor activity you want the yard to support. That might include dining, lounging, hosting friends, kids' play, pet relief, gardening, exercise, or a putting green.
Then trim that list to your top two or three priorities. This part matters. If space or budget gets squeezed, the hardscaping base - patios and walkways - should come first. It sets the layout and the way people move through the yard. Everything else gets built around that.
Clear priorities also help cut down on change orders and can make contractor pricing tighter.
Those priorities shape the comfort, privacy, and safety details to map out next.
Note Comfort, Privacy, and Safety Needs
For each main use, note what it needs to feel comfortable and safe. Inland afternoon temperatures can hit 85–95°F, so shade should go where the sun is strongest. That's not a small detail. A dining area without shade can turn into a space nobody wants to use.
If kids or pets are part of the plan, call out soft surfaces like artificial turf early. Also mark a clear split between play areas and any cooking or fire features. Privacy screening should be planned now, not tacked on later. That could mean horizontal slat fencing, raised planters, or ornamental grasses.
Use this step to think through how the yard will feel day to day, not just how it will look.
Match Activities to Rough Zones
Next, assign each top use to a rough zone. Keep it simple at this stage. You're not making a final plan yet. You're giving each activity a likely home.
- Pavers work well for dining zones and circulation paths.
- Turf fits play and pet areas.
- A pergola can set apart a lounging zone without boxing it in.
Size matters here too. Cooking zones need a minimum of 10 x 12 feet. Dining areas for 6–8 people need at least 12 x 14 feet. Pathways between zones should stay 4–5 feet wide so people can move through the yard without bumping into furniture or each other.
Use this rough zoning as the base for your site sketch.
Once the rough map is set, move on to measuring the yard and checking site conditions.
Measure the Yard and Record Site Conditions
Once you’ve marked out rough zones, it’s time to map the yard itself. A basic site sketch and a few key measurements can save you from nasty surprises later and make your estimates much tighter.
Sketch Existing Features and Take Measurements
Start with a simple hand-drawn sketch. It doesn’t need to look polished. It just needs to help you see the space clearly. Mark the house footprint, all exterior doors and windows, existing patios or concrete slabs, trees, fences, slopes, and any surface drains. Use feet and inches for every measurement.
Two details are easy to miss, but they matter a lot: property lines and access routes. Features like pergolas and patio covers need to stay within setback rules, and crossing those lines can lead to permit issues or even forced removal later. Access matters too. Measure side gates and access paths so you know whether crews can get materials and equipment into the backyard without a headache.
Then compare your rough zone plan against the actual yard. This is the moment to make sure each area fits before you move any further.
Check Sun, Shade, Grade, and Drainage
Walk the yard at different times of day and note where the sun hits. West-facing areas usually get hammered by afternoon sun from 2:00 PM to 5:00 PM, so mark those spots on your sketch if you’re planning shade structures, especially for dining or lounge areas.
Drainage deserves the same level of attention. After the next irrigation cycle or rain, walk the yard and look for low spots where water sits. Poor grading can cause pavers to shift or settle over time. If the yard has major slope changes, measure the elevation drop. In the City of San Diego, retaining walls over 3 feet above the footing often need a permit and engineering review.
Identify Utilities and Features to Keep or Remove
Call 811 before any digging. That service marks underground gas, electrical, and water lines before excavation starts.
From there, locate irrigation lines, plumbing, electrical runs, and gas connections. Write down where each utility sits and how far it runs, since longer trenching adds labor and material cost.
It also helps to make a simple keep vs. remove list. You might remove old concrete, dead plants, or broken irrigation. You may also have items the new design needs to work around. Putting that on paper before the first contractor meeting keeps the talk focused and the scope clear.
Once the site is documented, you can move from rough zones to actual surfaces and built-in features.
Plan Zones, Surfaces, and Built-In Features
With your sketch and measurements in place, you can turn that rough drawing into something buildable: clear zones, surface choices, and built-in features that fit the space.
Lay Out Dining, Lounge, Play, and Circulation Areas
Treat each zone like its own outdoor room. Draw dining, lounge, play, and circulation areas to scale using the minimum dimensions you mapped out earlier. For walkways, leave 4–5 feet of width so people can move through the yard without squeezing past chairs, planters, or built-ins.
When one surface shifts to another, like pavers meeting turf, plan those transitions carefully. Beveled edges or reveals help keep the change smooth and reduce trip hazards.
This same sketch should also show where surfaces change, where built-ins go, and how utility lines will run beneath the space.
Choose Surfaces That Fit Each Zone
San Diego heat is tough on outdoor materials. In inland areas, surface temperatures can climb past 140°F in summer. So the material you choose affects more than looks. It changes how the space feels to walk on, how much upkeep it needs, and how well it drains.
Match each surface to how the zone will be used, how much foot traffic it will get, and how much heat it will absorb. Here’s a side-by-side look at common options in San Diego:
| Surface | Maintenance | Heat Comfort | Installed Cost (per sq. ft.) | Best For |
|---|---|---|---|---|
| Artificial Turf | Very Low | Can get hot on sunny afternoons | $8–$20+ | Kids, pets, play areas |
| Concrete Pavers | Low | Moderate; light colors stay cooler | $20–$35 | Dining, lounge, walkways |
| Natural Stone (Travertine) | Low | High; stays naturally cool | $15–$30+ | Barefoot areas, pool decks |
| Stamped Concrete | Moderate | Moderate | $12–$28 | Large seamless patios |
| Gravel / Decomposed Granite | Low | High | $1–$4 | Paths, fire pit surrounds |
For dining and lounge areas, light-colored concrete pavers or travertine make a lot of sense. They wear well and stay cooler underfoot than darker materials. Around fire pits or along circulation paths, gravel or decomposed granite works well, especially where drainage matters. In play zones and pet areas, artificial turf installation keeps upkeep low, though it can get warm during sunny afternoons.
There’s also a rule to factor in early. California’s Model Water Efficient Landscape Ordinance (MWELO) limits turf to 25% of the landscaped area for most new residential projects over 500 square feet. If you want turf, size that zone with that cap in mind from the start.
Add Shade, Lighting, and Specialty Features
Shade structures, lighting, outdoor kitchens, and fire features need to be planned before construction begins. If gas, electrical, or water lines are going underground, trench them at the same time. Otherwise, you may end up tearing into a finished patio later.
For pergolas, aluminum tends to hold up better near the coast because of salt air, while wood pergolas usually cost more to install. If a pergola or patio cover sits over a built-in grill, it needs at least 10–11 feet of vertical clearance so heat and smoke can clear safely. In San Diego, patio covers over 300 square feet often need a building permit.
Lighting is another item worth pricing early. Basic LED landscape lighting packages usually run $1,500–$5,000 installed. Running conduit before the patio is poured can save a lot of money compared with adding it later. Fire pits also vary a lot in cost, from $2,500–$5,000 for prefabricated units to $25,000+ for custom masonry.
Once the layout is dialed in, the next step is to line up permits, budget, and contractor scope before work starts.
Review Permits, Budget, and Contractor Coordination
Once the design is locked in, the next step is simple in theory and messy in practice: turn that plan into a permit-ready scope and a bid-ready budget.
Confirm Permits, HOA Rules, and Utility Requirements
Some backyard projects don’t need permits. But guessing here can get expensive fast. In San Diego, the City can issue civil fines of up to $2,500 per day per violation, with a maximum of $10,000 per day or $400,000 total.
Here’s a quick check for common backyard work:
| Project Type | Permit Typically Required | Usually Exempt |
|---|---|---|
| Pergolas / Patio Covers | Over 300 sq ft, or any size in the Coastal Zone | ≤300 sq ft, ≤12 ft high, outside overlay zones |
| Outdoor Kitchens | Fixed islands with gas or electrical connections | Portable carts without permanent connections |
| Retaining Walls | Over 3 ft high, or supporting a load | Under 3 ft and not supporting a surcharge |
| Decks | Over 200 sq ft or more than 30 inches above grade | Under 200 sq ft and ≤30 inches above grade |
| Hardscape | Projects involving grading or drainage changes | Paver patios or artificial turf without grading/drainage work |
Before you file anything, confirm which agency has review authority. That part matters more than many homeowners expect. Jurisdiction decides which application you submit and who will inspect the job.
If your home is in an HOA, there’s another layer. Architectural Review Committee (ARC) approval is separate from city permits, so you need both. HOA reviews usually take 30–60 days. A smart move is to submit the HOA application and city permit application at the same time. That can save up to six weeks on the schedule.
Permit fees for most San Diego outdoor projects usually land in the $300–$1,200 range, depending on scope. Put that into the budget from day one, and build the review timeline into your planned construction start.
Set a Budget and Project Timeline
Break the budget into clear buckets: grading, drainage, hardscape, structures, and finishes. That makes bid review much easier later.
One cost area tends to surprise people: infrastructure. Grading, drainage, and irrigation usually make up 30–40% of the total project cost and have to be done before finish materials go in. In plain terms, the part you don’t notice at first often eats a big chunk of the budget.
A rough San Diego range looks like this:
- Essential ($10,000–$20,000): Basic paver patio (200–400 sq ft), simple lighting, and drought-tolerant planting
- Enhanced ($20,000–$50,000): Custom paver patios (400–600 sq ft), pergolas, built-in BBQ islands, and integrated fire pits
- Luxury ($40,000–$85,000+): Natural stone patios (600–1,000+ sq ft), full outdoor kitchens, smart lighting, and water features
Leave room for the stuff nobody wants to find. A 10–20% contingency fund helps cover buried debris, old wiring, or drainage problems that show up once work starts.
Timing matters too. In San Diego, fall and winter - about September through February - often come with better contractor availability and more competitive pricing. When you map out the start date, include permit processing time, which is usually 2–4 weeks, plus any HOA review period.
Use the finished budget to compare bids line by line. That’s one of the best ways to keep the scope from drifting halfway through the job.
Choose a Licensed Contractor and Finalize the Scope
Before you sign a contract, check the contractor’s license at cslb.ca.gov. Confirm the license is active and that the classification matches the work: C-27 for landscaping, C-8 for concrete, or B for general building.
Insurance matters too. Confirm they carry general liability insurance and workers' compensation, and ask to be listed as an additionally insured party on their Certificate of Insurance. It’s not glamorous paperwork, but it can save a major headache later.
California also limits deposits. Contractors can ask for 10% of the contract price or $1,000, whichever is less. If someone wants more than that upfront, they’re outside the law.
Get everything in writing with a line-item contract that covers demolition, haul-away, drainage prep, and materials. The more specific the scope, the less room there is for confusion once the crew is on site.
Have the contractor pull permits in their name. That ties them to inspection responsibility and helps protect you from liability if work fails inspection. Before signing, confirm who your day-to-day point of contact will be and get the change order process in writing.
Once that contract is signed, the project is ready to move into construction.
Conclusion
The best results usually come from doing things in the right order.
A multi-functional outdoor space tends to work best when the planning happens first. Start by defining how you’ll use the space. Then measure the site conditions and map out your zones, surfaces, shade, and lighting before construction begins.
Once the layout is set, keep HOA approval, permits, budget, and contractor coordination in sync so the project stays on track.
If you want help with planning or installation, United Turf & Pavers offers backyard remodeling and artificial turf services in San Diego, including patios, pavers, pergolas, lighting, drainage, and turf.
FAQs
How do I choose the right backyard priorities?
Start with the way your household will actually use the space. Maybe that means hosting friends, giving kids room to play, or carving out a calm spot to unwind after work.
Put the layout first, before add-ons like outdoor kitchens or fire pits. Set up clear zones for cooking, dining, and lounging. Then handle grading, drainage, and irrigation before you move on to hardscape or high-end finishes.
What permits might my outdoor project need?
In San Diego, permit rules depend on what you're building, where the property is, and whether the project adds structural elements.
Structural features like pergolas or patio covers over 300 square feet, outdoor kitchens with utility connections, and retaining walls over 3 feet tall usually need a building permit.
Separate permits are also required for:
- Electrical work
- Plumbing work
- Gas work
If the property is in the Coastal Zone, you may also need a Coastal Development Permit.
United Turf & Pavers handles permit applications and HOA architectural reviews.
How much should I budget for hidden costs?
Hidden costs show up all the time in backyard remodels. And they can tack on $2,000 to $10,000 to your total bill.
A smart move is to set aside a 10% to 20% contingency fund. That buffer can save you a lot of stress when the project hits the kind of surprise that tends to pop up once work starts.
These extra costs often come from things like:
- permits
- utility runs
- demolition
- site problems, such as buried debris or poor drainage
Ask for a detailed, line-item quote before work begins. That way, you can see exactly what’s included and cut down the chance of costly change orders.