.webp)
Essential Steps for Planning Your Backyard Remodel in San Diego
June 17, 2026
If I want a short answer, it’s this: I need to decide how I’ll use the yard, set a budget with a 10%–15% backup cushion, measure the space, check drainage and utility lines, choose materials that fit coastal or inland conditions, and sort out permits and contractor details early. That helps me avoid rework, permit delays, and added costs.
Here’s the whole game plan in simple terms:
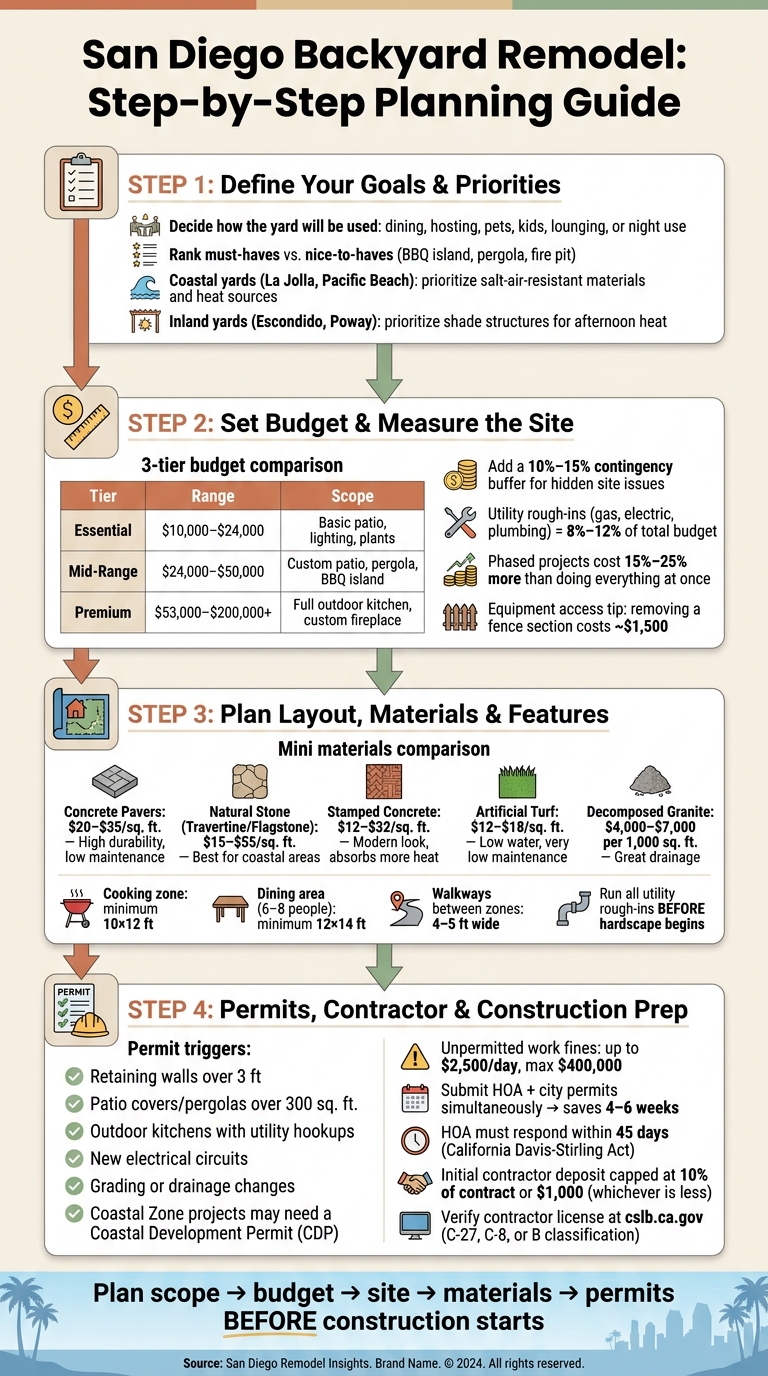
- Start with use first. I decide if the yard is for dining, hosting, pets, kids, lounging, or night use.
- Rank features. I separate must-haves from add-ons like a BBQ island, pergola, or fire pit.
- Set a budget range. Many San Diego backyard projects fall between $10,000 and $200,000+, depending on size and features.
- Hold back extra money. A 10%–15% cushion helps cover site issues found after demolition.
- Measure the yard. I note width, length, slopes, doors, trees, access points, and old hardscape.
- Check the site early. Drainage, grading, sun exposure, and gas/electrical/plumbing lines should be reviewed before surfaces go in.
- Plan rough-ins now, not later. Utility work can take 8%–12% of the total spend, so I want that in the plan from the start.
- Match materials to local conditions. Coastal yards need salt-air-resistant picks. Inland yards often need more shade and cooler surfaces.
- Know permit triggers. Walls over 3 feet, utility hookups, some pergolas or patio covers, and grading changes may need approval.
- Choose the contractor with care. I check license, insurance, scope details, payment terms, and who is pulling permits.
A few numbers stand out. Doing a project in phases can cost 15%–25% more than doing it all at once. And if an HOA and city review happen at the same time, that may cut 4–6 weeks from the timeline.
Bottom line: if I handle planning first, the build phase is much less likely to turn into a budget and schedule problem.
San Diego Backyard Remodel: Step-by-Step Planning Guide
Need Backyard Inspiration? Check out the Ultimate Backyard Renovation it has everything!!
sbb-itb-2b3b7d5
1. Define Your Goals, Daily Use, and Project Priorities
Before you measure anything or start picking materials, get clear on how the yard needs to work. Who uses it? And at what time of day?
That part matters more than people think. If the yard gets used mostly during the day, shade moves to the top of the list. If it gets more use at night, lighting and fire features start to matter more. Write those needs down in a short brief. It sounds simple, but that one step makes layout, feature, and budget decisions much easier.
How You Use the Yard Now vs. How You Want to Use It
Start with the yard you have today, then compare it to the yard you want. Maybe it’s just sitting there now, but you want it set up for hosting, outdoor dining, kids, or pets. That gap is what shapes the scope of the project.
In San Diego, your location can shift the whole priority list. Coastal homes in places like La Jolla or Pacific Beach need to factor in the marine layer, cool evening breezes, and salt-air exposure. In those yards, a heat source or corrosion-resistant materials like aluminum often make more sense. Inland homes in areas like Escondido or Poway deal with strong summer heat, so shade structures matter more for midday use.
Put simply:
- Coastal yards need materials that hold up to salt air and features that make evenings more comfortable.
- Inland yards need stronger shade for hot afternoons.
In San Diego, the job usually comes down to balancing shade, airflow, and material durability.
Must-Have Features vs. Nice-to-Have Upgrades
Once you know how you want to use the yard, rank the features. Some items need to be there from day one because they make the space usable. Think patio, drainage, lighting, or turf. Other items add comfort or style, but they can wait a bit, like a pergola, built-in BBQ island, fire pit, putting green, or outdoor kitchen.
This ranking helps protect your budget. A phased approach can help with cash flow, especially if you tackle hardscaping and drainage first, then shade structures, then higher-end finishes and lighting.
There’s one catch: phased projects usually cost 15% to 25% more overall than doing everything at once. That’s why it pays to think ahead. If you may want a fire pit, BBQ, or outdoor kitchen later, plan gas and electrical rough-ins early so you don’t have to tear up finished areas.
Match Your Goals to the Right Backyard Features
Once your priorities are in order, it gets easier to match each goal to the right feature.
| Goal | Recommended Solution |
|---|---|
| Low-water lawn replacement | Artificial turf or drought-tolerant softscape |
| Heavy-use patio | Concrete pavers or natural stone; travertine stays cooler underfoot |
| Shade for inland heat relief | Aluminum pergola or solid patio cover |
| Evening use and ambiance | Low-voltage LED path lights and a gas fire pit |
| Sloped or canyon lot | Retaining walls and drainage planning; walls over 3 ft require engineering in San Diego |
Use this as a working guide when you think through budget, measurements, and contractor talks. Once the priorities are clear, you can line them up with both your budget and the conditions of the site.
2. Set a Realistic Budget and Measure the Site
Once you know what you want from the yard, put numbers to it. That means setting a budget that matches the job and the site. A backyard remodel isn't just about the patio surface or the plants you pick. You also need to price in shade, lighting, turf, drainage, and any gas, electrical, or plumbing work the space calls for.
Budget Tiers and Cost Ranges for San Diego Backyard Projects
San Diego backyard remodel budgets are shaped by labor, permits, and material selection.
| Budget Tier | Typical Range | Typical Scope | Best Fit |
|---|---|---|---|
| Essential | $10,000 – $24,000 | Basic paver or concrete patio (200–400 sq. ft.), simple lighting, drought-tolerant plants, gravel or mulch | Fast build; limited to one main zone. |
| Mid-Range | $24,000 – $50,000 | Custom paver patio (400–600 sq. ft.), pergola, built-in BBQ island, fire pit, smart irrigation | Adds multiple zones; gas and electrical may need permits. |
| Premium | $53,000 – $200,000+ | Natural stone, full outdoor kitchen, custom fireplace, automated lighting, architectural shade structures | Resort-level finish; longer timeline and heavier permitting. |
Start with the unglamorous stuff first: drainage, grading, and utility rough-ins. Those items don't always show up in mood boards, but they can eat a big part of the budget if you skip them early. Running dedicated gas, electrical, and plumbing lines usually takes up 8%–12% of total project spend.
It's also smart to leave room for surprises. Add a 10%–15% contingency on top of your planned budget. Once demolition starts, crews often find problems that were hidden before, like crumbling utility lines or expansive clay soil.
After the budget tier is set, measure the yard so the plan fits the space instead of fighting it.
How to Measure Your Yard and Record Physical Constraints
Measure the yard in feet and write everything down: length, width, house-to-property-line distance, door and window locations, and any hardscape that's already there. Mark tree root zones, where slopes begin, and whether the side yard is tight enough to block equipment access.
That access point matters more than people think. If a bobcat can't get through the side yard, labor goes up and soil hauling gets more expensive. In some cases, removing part of a fence to let equipment in costs about $1,500.
A simple scaled sketch is enough here. Even graph paper works. Use it to block out rough zones for:
- Dining
- Lounging
- Turf
- Circulation
The goal isn't a polished plan yet. You're just getting the yard onto paper so you can see what fits and what doesn't.
After that, check how sun, slope, drainage, and utility lines shape the layout.
Check Sun, Drainage, Soil, and Utilities Before Finalizing the Layout
Before you lock in the layout, spend a little time watching the yard. Look at where the sun lands in the morning, where it shifts at midday, and which spots are still baking in late afternoon. West-facing yards get hit with the toughest afternoon sun, so they need the most shade coverage.
Location inside the county changes material choices too. Inland yards usually need more shade. Coastal yards need materials that can handle salt air and corrosion better.
After rain, walk the yard and look for pooling water or erosion. This step can save you a headache later. San Diego has strict drainage rules, and runoff that pushes toward a neighboring property can trigger permit requirements. If drainage is a problem, budget for fixes like French drains or catch basins.
Before any design gets finalized, identify irrigation, gas, electrical, and sewer or septic lines. And before any digging starts, call 811.
With the budget, measurements, and site limits written down, the layout and material list start to get a lot easier.
3. Plan the Layout, Materials, and Features for San Diego Conditions
Once your budget and site measurements are set, turn them into a clear layout before any hardscape goes in. Start by dividing the yard into zones. Then match each zone with the right surface, shade, and utility plan.
Create a Basic Zoning Plan for Function and Flow
Use pavers, changes in height, or pergolas to separate each zone. The goal is simple: lay out the space based on how people will move through it.
A cooking zone needs at least 10×12 feet for appliances and prep space. A dining area for 6–8 people needs at least 12×14 feet. Walkways between zones should be 4–5 feet wide so two people can pass without squeezing by each other.
Sun matters here more than people think. West-facing yards get hit with the strongest afternoon heat, so that’s the side where shade structures usually make the most sense. At the same time, leave at least one open spot to catch winter sun.
For privacy, you’ve got a few solid options:
- Slat fencing
- Lattice panels
- Bamboo
- Ornamental grasses
Those zoning choices shape everything that comes next, from surface picks to gas, power, and drainage runs.
Compare Materials for Patios, Turf, and Walls
Your material picks affect comfort, upkeep, and how well the yard holds up in San Diego’s mix of coastal salt air, inland heat, and clay soil.
| Material | Installed Cost | Durability | Maintenance | San Diego Fit |
|---|---|---|---|---|
| Concrete Pavers | $20–$35/sq. ft. | High | Low | Excellent; light colors stay cooler in inland heat |
| Natural Stone (Travertine/Flagstone) | $15–$55/sq. ft. | Superior | Low | Best for coastal areas; stays naturally cool underfoot |
| Stamped Concrete | $12–$32/sq. ft. | Moderate | Medium | Good for modern aesthetics; absorbs more heat |
| Artificial Turf | $12–$18/sq. ft. | High | Very Low | Good for low-water landscapes and low maintenance |
| Decomposed Granite | $4,000–$7,000 per 1,000 sq. ft. | Moderate | Medium | Excellent permeability; works well in drainage-heavy zones |
A couple of points stand out. Concrete pavers handle ground movement better than poured concrete, which is more likely to crack in San Diego’s expansive clay soils. And if you’re planning a pool deck or a barefoot sitting area, travertine and other natural stone surfaces stay much cooler than concrete on a hot afternoon.
After you choose the surface materials, map out the shade, lighting, and utility lines before work starts. That step can save a lot of hassle later.
Plan Shade, Lighting, Fire, and Low-Water Details Early
Once the layout is done, handle all rough-ins before the hardscape begins. That means routing gas, electrical, drainage, and plumbing lines first.
Shade material matters for more than appearance. Aluminum pergolas ($20–$30/sq. ft. installed) work well for coastal homes in places like La Jolla or Del Mar because they resist salt-air corrosion and need no upkeep. Wood pergolas in cedar or redwood ($35–$65+/sq. ft.) bring a warmer, more natural look, but they need resealing every 2–3 years.
For lighting, run the wiring during the base work phase so it’s in place before the hardscape is finished. Put pergola, lighting, fire feature, and outdoor kitchen rough-ins on the same plan. That way, you won’t have to cut into finished surfaces later.
4. Review Permits, Choose a Contractor, and Prepare for Construction
Once your layout and utility plan are set, permits and contractor checks are the last big step before work starts. This part matters. If you skip it, the project can stall, costs can pile up, and you could end up dealing with fines.
When You Need Permits and HOA Approval in San Diego
A lot of backyard projects in San Diego need permits. That usually includes retaining walls over 3 feet, patio covers or pergolas over 300 sq. ft., outdoor kitchains with utility hookups, new electrical circuits, and grading or drainage changes that alter runoff. If you're not sure which agency has authority over your property, you can check your parcel through the San Diego County Assessor's lookup tool at sdarcc.gov.
If your home is in a coastal area like La Jolla or Del Mar, you may also need a Coastal Development Permit (CDP), no matter how small the project seems. That can add several weeks to the timeline. And unpermitted work isn't a small gamble. Fines can reach up to $2,500 per day per violation, with a total cap of $400,000.
HOA approval is a separate step from city permitting. The HOA looks at appearance. The city looks at code. So don't wait on one before starting the other. Submit both at the same time. Running them in parallel can trim 4–6 weeks from the overall schedule. Under California's Davis-Stirling Act, HOAs must respond to architectural requests within 45 days, or the request may be considered approved.
| Feature | Permit Required? | HOA Approval Required? |
|---|---|---|
| Retaining Walls | Yes (if >3 ft or supporting surcharge) | Yes |
| Patio Covers/Pergolas | Yes (if >300 sq. ft. or in Coastal Zone) | Yes |
| Outdoor Kitchens | Yes (for gas, electric, or plumbing) | Yes |
| Artificial Turf | No (usually exempt) | Yes (style/color) |
| Hardwired Lighting | Yes (new circuits/outlets) | Yes (if visible) |
| Grading/Drainage | Yes (if altering runoff patterns) | Yes |
Once those approvals are in motion, it's time to choose a licensed contractor and lock down the scope in writing.
What to Check Before You Sign a Contractor Agreement
Start with the license check at cslb.ca.gov. Make sure the contractor has the right classification for the job: C-27 for landscaping, C-8 for concrete work, or B for general building. You should also get proof of general liability and workers' compensation coverage, and ask to be named as an additional insured.
The contract should be specific. It needs line items for demolition, debris haul-away, permit fees, drainage prep, and site cleanup. If the scope is fuzzy, change orders tend to show up later. California law also limits the initial deposit to 10% of the total contract price or $1,000, whichever is less.
It also helps to pin down who is handling permits. A solid contractor pulls permits in their own name. They shouldn't push that job onto the homeowner. Before you sign, ask for a written schedule that includes phase milestones and material lead times.
How to Prepare for the Build and Final Walkthrough
Before the crew shows up, clear out furniture and plants, lock in material orders, confirm access and staging areas, and get ready for noise, dust, and limited use of the yard. It's also smart to name one person on your side as the daily point of contact. That keeps small decisions from slowing down the whole job.
At the end, use the final walkthrough to check that the finished work matches the approved plan. Before you make the last payment, walk the site with your contractor and verify:
- Layout and finishes match the approved plan
- All lighting and electrical outlets are tested and working
- Drainage drains properly during a hose test
- Written warranties and care instructions are included for every installed feature
Conclusion: Key Planning Steps to Complete Before Construction Starts
A backyard remodel in San Diego tends to move faster when the planning work is done upfront. The order matters. First, lock in the scope, budget, and site conditions. Then finish the design with those details in place.
Once the scope is clear, the material choices should fit both the property and San Diego’s climate. In plain terms, pick materials that can handle coastal exposure and hot, sun-heavy yards.
After the layout and material selections are done, approvals become the last checkpoint before construction starts. Filing HOA and permit applications at the same time can save up to six weeks on the overall timeline.
With the scope, site, materials, and approvals finalized, the project is ready for construction.
FAQs
How long does a backyard remodel usually take in San Diego?
A complete backyard remodel in San Diego usually takes 3 to 6 months from the first consultation to final completion.
Bigger jobs, especially those with pools or major structural features, can stretch to 9 to 12 months.
On the other end of the range, smaller backyard makeovers may take just a few weeks. More involved builds often take several months, plain and simple.
One thing that can slow the timeline is approvals. Permit processing and HOA review can add extra time, sometimes several weeks or even a few months. HOA review alone often takes 30 to 60 days.
What should I remodel first if my budget is limited?
If your budget is tight, put your money into site preparation and structural basics first, not cosmetic add-ons. Start with drainage, grading, and access. Those pieces help your yard hold up over time and can save you from expensive repairs down the road.
After that, move to the core layout and hardscaping base, such as a simple patio or walkways. Extras like lighting, furniture, pergolas, or an outdoor kitchen can come later in phases as your budget allows.
How do I know which backyard materials will last best in my area?
Choose materials based on where you are in San Diego and what the site has to deal with.
Near the coast, skip standard metals and porous surfaces. Salt air can wear them down fast. Go with 316L marine-grade stainless steel, AAMA 2605 powder-coated aluminum, solid brass or copper lighting, and non-porous porcelain pavers instead.
In hotter inland areas, travertine stays cooler underfoot, which makes a big difference on warm days. Aluminum pergolas are also a smart pick if you want shade that lasts without much upkeep.
It also helps to have a pro check the soil and drainage before you move ahead.