.webp)
.webp)

Fire Feature and Outdoor Kitchen Layout Tips for San Diego
August 19, 2026
A good San Diego backyard layout keeps the grill near the house, puts the fire feature in its own seating area, and leaves enough space for heat, smoke, and foot traffic.
If you’re planning an outdoor kitchen and fire feature together, the main layout rules are simple: work with sun and wind first, split the yard into kitchen, dining, and fire zones, and keep safe distance between flames, structures, and walkways. In San Diego, that matters even more because coastal yards get steady afternoon breezes, inland yards run hotter, and some areas have tighter fire-risk rules.
Here’s the short answer:
- Place the outdoor kitchen near the back door and utility lines
- Keep the fire feature separate from the cooking path
- Plan walkways at about 4 to 5 feet wide
- Use gas fire features in some high-fire-risk areas
- Check clearances for grills, pergolas, walls, trees, and roofs
- Use cooler, noncombustible surfaces near heat zones
- Match the layout to yard size, from a small 200 sq. ft. patio to a 1,000+ sq. ft. backyard
San Diego’s weather shapes the plan fast. Coastal summer temperatures often sit around 72°F to 77°F, while inland areas often hit 85°F to 95°F from June through October. And west-facing patios usually take the most afternoon sun from 2:00 PM to 5:00 PM. That means shade, smoke direction, and material choice should be part of the layout from the start.
Quick Comparison
| Area | What to do | Main numbers to know |
|---|---|---|
| Kitchen zone | Put it near the house and utilities | About 5 to 15 feet from the house |
| Dining zone | Use it as the link between cooking and lounge space | Often around 12' × 14' |
| Fire seating zone | Keep it separate but connected | Often 20+ feet from the house |
| Walkways | Leave room around stools, seating, and hot surfaces | 4 to 5 feet wide |
| Wood-burning fire pit | Keep far from structures | At least 25 feet |
| Permanent gas fire pit | Can sit closer than wood-burning units | At least 10 feet from combustible structures |
| Portable gas fire unit | Check unit rules before placement | Usually 15 feet |
| Grill under cover | Watch overhead clearance | About 9 to 11 feet |
| High-fire-risk lots | Check San Diego fire pit safety rules regarding ember-zones and fuel limits | 5-foot noncombustible clearance in some areas |
This article breaks down the layout in plain terms so you can plan a yard that feels open, safe, and easy to use day to day.
sbb-itb-2b3b7d5
Start with San Diego Conditions Before Picking a Layout
Start with sun, wind, lot shape, and fire risk. Those factors narrow your layout options before you get into features.
Coastal vs. Inland Sun and Temperature Patterns
Your part of San Diego County changes the plan more than most people expect. Coastal areas like La Jolla usually stay in the 72–77°F range in summer, while inland spots like Escondido and Santee often climb to 85–95°F from June through October.
That temperature gap affects the whole setup. Inland yards usually need shade first, then everything else. A patio cover or pergola often sets the base for daytime comfort. Coastal yards are cooler, but salt air and humidity can be hard on surfaces, so it makes sense to use corrosion-resistant materials for countertops, appliances, and pergola parts.
West-facing patios take the hardest hit from afternoon sun, especially from 2:00 PM to 5:00 PM. If your cooking or dining area faces west, plan for shade from day one.
Once you know how the sun hits the yard, look at wind and door placement to fine-tune where the grill, table, and lounge area should go.
Wind Direction, Smoke Movement, and Door Placement
Coastal San Diego gets steady afternoon onshore breezes from spring through fall. That sounds nice - and it usually is - but it can cause problems fast if smoke gets pushed toward your seating area or back into the house.
The goal is simple: move smoke away from people and away from openings. In exposed coastal yards, a fireplace often works better than a fire pit because it blocks wind and holds heat more effectively. Grill placement matters too. If the grill sits too close to windows or doors, smoke can drift inside, which gets old fast.
A few things matter here:
- Place grills and fire features so smoke moves away from seating
- Watch nearby windows and doors before locking in the cooking zone
- In breezy yards, a fireplace may work better than an open fire pit
After that, check lot size and local fire-zone limits before picking the feature type.
Lot Size, Access, and High-Fire-Risk Areas
Smaller urban lots don’t leave much room for separate activity zones. In those yards, a straight kitchen island that runs 8–12 feet is often the cleanest and most workable layout. Instead of trying to squeeze in multiple islands, one compact cooking run usually makes better use of the space.
Fire-zone rules can narrow the choices even more. In high-fire-risk areas like Poway, Rancho Santa Fe, and Olivenhain, homes may need gas or propane fire features instead of wood-burning ones. These properties also require a 5-foot noncombustible clearance around any fire feature.
That rule affects more than the flame source itself. It also shapes what materials you can use nearby and how tightly you can place surrounding elements. Checking a property’s fire hazard status before choosing materials or locking in feature placement can save you from an expensive redesign later.
With climate and site limits mapped out, the next step is dividing the yard into kitchen, dining, and fire zones.
Divide the Yard into 3 Zones: Kitchen, Dining, and Fire Seating
Split the yard into three clear zones: kitchen, dining, and fire seating. Start with the kitchen first, because it sets the location for utility lines and shapes the main work route.
Place the Outdoor Kitchen Close to the House and Utilities
Put the outdoor kitchen near the back door. Shorter utility runs can cut trenching for gas, water, and electrical lines. It also saves the cook from dragging food, tools, and supplies across the patio every time dinner starts.
A tight work triangle between the grill, prep counter, and refrigerator helps the space work better and keeps the cook out of the main walking path. On a smaller patio, a straight island usually makes the most sense. In a standard backyard, an L-shape can define the corner and help the cook stay turned toward guests.
Position the Fire Feature in a Separate but Connected Lounge Area
Once the kitchen is set, move the fire feature into its own seating pocket. Give it a separate lounge zone that still feels tied to the dining area, but keep it out of the cook’s main route and away from smoke drift into seating and circulation paths. Putting the dining zone between the cooking area and fire seating helps keep guest traffic out of the kitchen.
Site the fire feature for night use, not daytime appearance.
You can define each zone without making the yard feel smaller. A change in paver pattern, a slight level shift, or pergola placement can do the job.
Zone Planning Comparison Table
Use the table below to estimate each zone before you lock in materials and furniture.
| Zone | Primary Purpose | Typical Min. Footprint | Best Surface Type | Ideal Distance from House |
|---|---|---|---|---|
| Kitchen | Cooking & Prep | 10' × 12' | Sealed pavers or concrete | 5'–15' (Near utilities) |
| Dining | Meals & Hosting | 12' × 14' | Pavers or natural stone | 15'–25' (Central) |
| Fire Seating | Relaxation | 12' × 12' | Travertine or non-combustible pavers | 20'+ (Destination zone) |
Travertine is a smart pick for the fire seating zone because it stays cooler than concrete in inland heat. Treat these dimensions as planning baselines, not final code clearances.
Safe Distances Between the Fire Feature, Kitchen, and Walkways
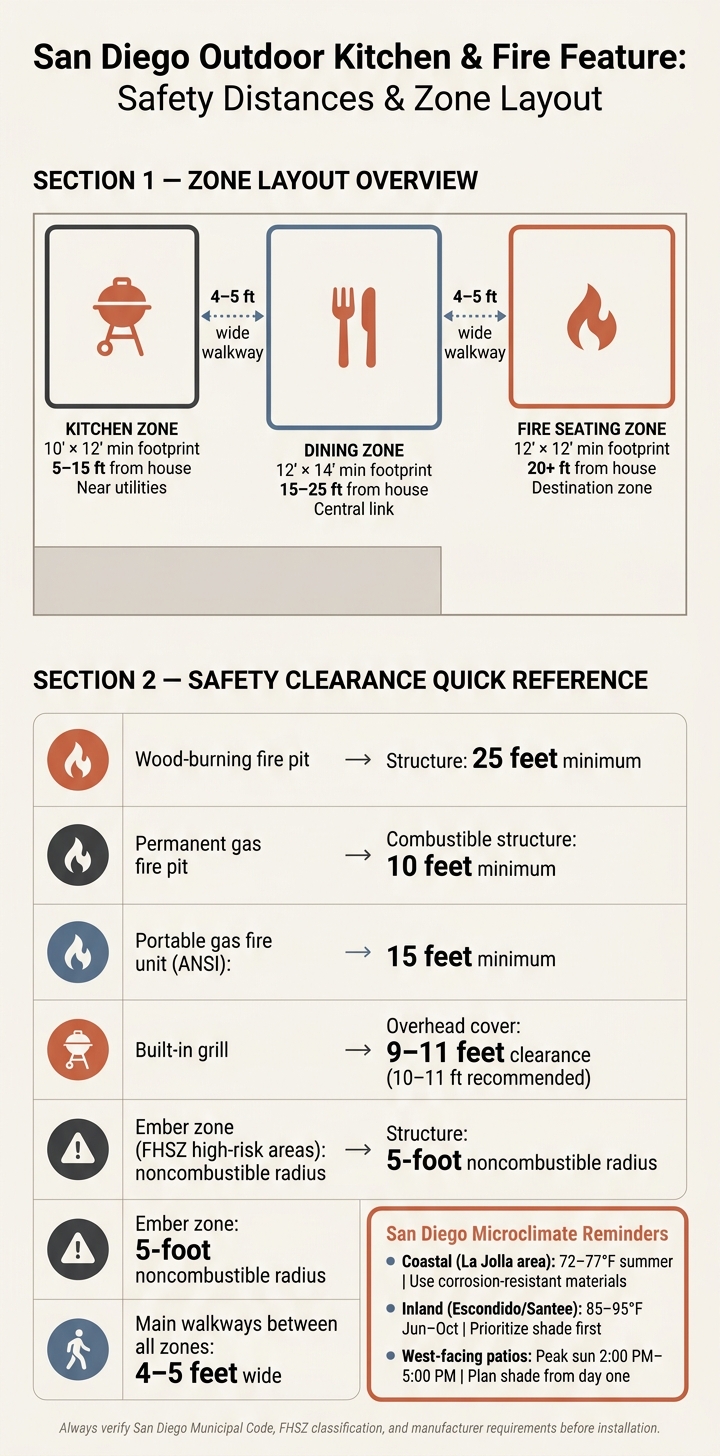
San Diego Outdoor Kitchen & Fire Feature Safety Distances Cheat Sheet
Once the three zones are mapped, the next step is spacing. This is where a layout goes from looking good on paper to feeling safe and easy to use in daily life. Use the distances below as planning baselines, then check local code and the manufacturer's rules before installation.
Setbacks from Walls, Roofs, Trees, and Grills
The amount of clearance you need depends on the type of fire feature. In San Diego, wind patterns and fire-risk rules make spacing just as important as the layout itself.
A wood-burning fire pit needs at least 25 feet of clearance from any structure. That includes walls, fences, pergolas, and roof overhangs. A permanently installed gas fire pit can be closer, with a minimum of 10 feet from combustible structures. Portable gas fire units that meet ANSI standards usually need 15 feet.
Overhead space above a grill matters too. A built-in grill under a pergola or covered patio needs 9 to 11 feet of clearance, and 10 to 11 feet is the standard recommendation. If the cover sits lower than that, don't place the grill underneath it.
In Very High Fire Hazard Severity Zones (FHSZ), there must be no combustible materials within a 5-foot ember zone around the fire feature.
Keep Walking Paths Clear Around Hot Zones
Main walkways should stay 4 to 5 feet wide between zones. That extra room helps people move around without brushing past heat, smoke, or the cook at the grill.
It also helps to route traffic around seating groups instead of through them. If guests need to cut across the fire seating circle or squeeze behind bar stools just to reach the dining area, the plan needs work. A clean loop from kitchen to dining to fire lounge usually works best, especially when you want to avoid traffic jams near flames or hot appliances.
For a U-shaped kitchen with bar seating, plan on at least 14 by 18 feet for the full footprint. That keeps the work zone usable and leaves enough room behind the stools for people to walk without feeling boxed in.
Safety Spacing Reference Table
These are planning baselines. Verify San Diego Municipal Code, FHSZ classification, and manufacturer requirements before finalizing any layout.
| Feature or Zone | Typical Planning Distance | Notes |
|---|---|---|
| Wood-burning fire pit to structure | 25 feet | Walls, fences, pergolas, roofs |
| Permanent gas fire pit to structure | 10 feet | Combustible structures only |
| Portable gas fire unit to structure | 15 feet | ANSI-certified units |
| Grill to overhead cover | 9–11 feet | 10–11 feet is the standard recommendation |
| Ember zone (FHSZ areas) | 5-foot radius, no combustibles | Applies to fire features in very high-risk zones |
| Main walkways | 4–5 feet wide | Between all zones |
| U-shape kitchen with bar seating | 14 × 18 feet minimum | Total footprint including seating |
Every fire feature should sit on a noncombustible surface, such as pavers or concrete.
With the clearances in place, you can move on to seating and surface choices without blocking traffic or creating extra heat problems.
Seating, Traffic Flow, and Materials for Daily Use
Once your clearances are set, the next step is simple: make the space easy to sit in, move through, and use every day. Start with seating, walking paths, and serving flow. Then pick surfaces and finishes that can handle the heat, foot traffic, and weather.
Seating Arrangements That Fit the Fire Feature and Yard Size
The fire feature should shape the seating plan.
A fire pit usually works best with curved seating. That curve keeps people facing the flame and helps conversation feel natural. A built-in bench that wraps around the pit does this especially well.
A fireplace tends to work better with a U-shape or a loose arc in front of it. In this setup, the fireplace becomes the main focal point. In exposed coastal yards, it can also help block wind.
On the kitchen side, bar stools along an island let guests stay near the cook without getting in the way. If you have an L-shaped counter, one leg can handle cooking while the other works as guest seating. The key is to keep the prep area open so no one has to cut across the cook's path.
Sight lines matter just as much as seat placement. If possible, the person at the grill should be able to see both the dining table and the fire seating area. That one detail helps the whole yard feel tied together, even when the zones sit apart.
How to Use Pavers, Concrete, Pergolas, Turf, and Lighting
After you map out seating, choose surfaces and shade that hold up to daily use.
Light-colored concrete pavers or travertine are a smart pick for hot inland afternoons because they stay cooler underfoot. For countertops, skip quartz. In direct San Diego sun, it can discolor. Sintered stone like Dekton is the top premium pick for San Diego, while granite or quartzite are durable mid-range options.
Artificial turf can soften the edge of a patio, but keep it buffered away from heat zones. Pergola height should match the grill's required clearance. For drainage, slope the surface so water runs away from the house foundation. On larger paver areas, underground drainage lines with surface drain caps can help stop standing water.
Lighting is what keeps the yard usable after sunset. A simple mix covers most needs:
- Path lighting between zones
- Task lighting above the counter
- Accent lighting near the fire seating
Low-voltage LED fixtures on smart timers make on/off control automatic.
Small, Medium, and Large Backyard Layout Comparison
Use the layout scale below to match your yard size with the right kitchen and fire setup.
| Layout Scale | Patio Size | Kitchen Style | Fire Feature | Best Fit |
|---|---|---|---|---|
| Small | 200–400 sq. ft. | Straight island, 8–12 ft | Portable or basic gas pit | Maximizes a tight footprint with clear circulation between cook and guests |
| Medium | 400–600 sq. ft. | L-shape, 12–18 linear ft | Integrated pit with seat walls | Separates kitchen and fire zones while keeping flow between them |
| Large | 600–1,000+ sq. ft. | U-shape or custom, 16+ ft | Custom masonry fireplace | Supports high-capacity entertaining with distinct zones and 4–5 ft walkways throughout |
Conclusion: Build a Layout That Feels Open, Safe, and Easy to Use
A good San Diego backyard layout starts before the hardscape goes in. Start with San Diego's microclimate. Coastal yards need wind-aware placement and materials that can handle salt air, while inland yards need built-in shade and ways to cut the heat.
From there, keep the layout simple and deliberate. Follow outdoor kitchen design tips by placing the setup near utilities, give the fire feature its own lounge zone, and make walkways wide enough for smooth, easy movement. This is the sequence the design team at United Turf & Pavers works through on nearly every layout consultation, before any material gets picked.
Drainage, surface choice, and lighting are what make the space work day after day. Finish with solid drainage, cooler surface materials, and layered lighting so the yard stays comfortable in the daytime and after sunset.
The best San Diego layouts feel open, safe, and easy to use because each zone has a clear job.
FAQs
Do I need a permit for this layout in San Diego?
It depends on your design and where your property is located. Portable, freestanding fire pits and grill carts usually don't need permits.
But once the project becomes permanent, permits often come into play. That includes fixed masonry islands, permanent gas lines, plumbing, electrical work, or built-in structures. If your home is in the Coastal Overlay Zone, permits are required no matter the project size. Your HOA may also require a separate architectural review.
What layout works best for a small backyard?
For a small San Diego backyard, a straight island kitchen is usually the most compact and budget-friendly choice. In most cases, it uses about 8 to 12 linear feet, which makes it a smart fit when space is tight.
An L-shaped layout can also work well, especially if it tucks neatly into a corner and leaves the middle of the yard open. That open center matters. It helps the space feel less cramped and gives people room to move around without bumping into the kitchen area.
For the fire feature, a gas fire pit is often the better pick in a smaller yard. It gives you 360-degree seating and takes up less room than a fireplace. In a tight layout, that smaller footprint can make a big difference.
Start with the hardscaping foundation first. That sets the traffic flow and marks out the main use zones, so the kitchen, seating, and fire feature all work together instead of fighting for space.
How do I reduce smoke near seating areas?
Plan the layout around local wind patterns. Put cooking and fire zones downwind from dining and lounge areas so smoke doesn’t drift straight into the guest space.
For covered outdoor kitchens, leave 9 to 11 feet of vertical clearance so heat and smoke can clear out more easily. If the space is partially enclosed, use engineered ventilation. Keep grills and fire features away from house windows, and follow the manufacturer’s clearance rules for combustible materials.