.webp)
Outdoor Kitchen Design Tips for San Diego Homes
June 11, 2026
Building an outdoor kitchen in San Diego is a smart way to enjoy the city’s sunny weather and boost your home’s value. With over 260 sunny days per year, outdoor kitchens allow for year-round cooking and entertaining. But designing one requires careful consideration of local climate, materials, and layout.
Here’s what you need to know:
- Climate Matters: Coastal areas like La Jolla face salty air, which can corrode materials, while inland areas like Santee experience higher heat, requiring cooling strategies like shade and heat-resistant surfaces.
- Durable Materials: Use 316-grade stainless steel, porcelain countertops, and HDPE cabinets to withstand San Diego’s sun, salt air, and moisture. Avoid quartz or wood, as they don’t hold up outdoors.
- Layout Tips: Divide your kitchen into zones (prep, cooking, cleaning, serving) for efficiency. Keep grills downwind of seating areas and ensure proper drainage to prevent water damage.
- Features to Include: A built-in grill, outdoor-rated refrigerator, sink, and weather-resistant cabinets are must-haves. Add upgrades like a pizza oven, fire pit, or beverage center for entertaining.
- Shade and Lighting: Pergolas or umbrellas provide relief from the sun, while layered lighting ensures usability after dark.
Pro Tip: Plan utility connections (gas, water, electricity) early to avoid costly retrofits. Coastal properties may also require extra precautions against corrosion.
Designing an outdoor kitchen tailored to San Diego’s unique climate and lifestyle ensures it’s functional, long-lasting, and a great addition to your home.
Outdoor Kitchen Design SECRETS: What to Know Before You Build
sbb-itb-2b3b7d5
San Diego Climate and Site Conditions to Know Before You Build
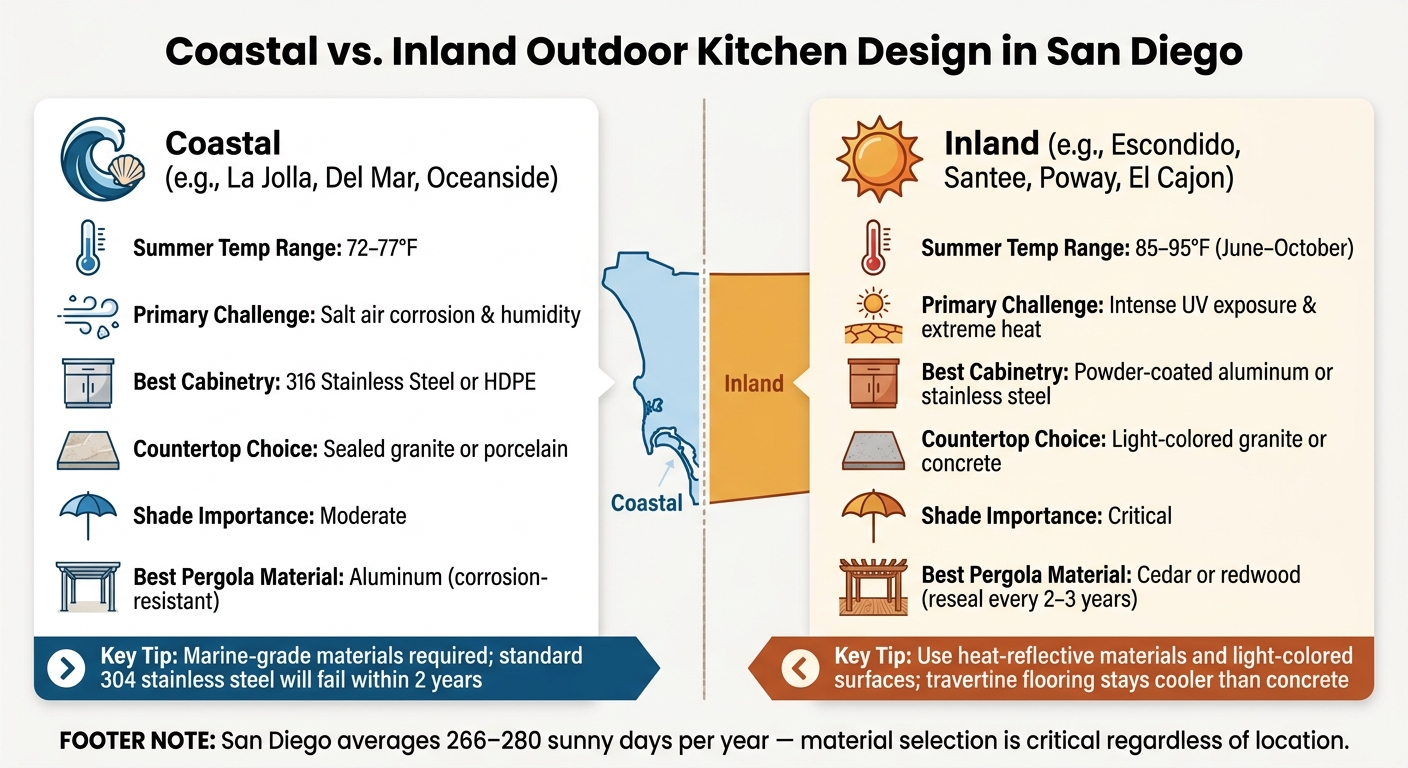
Coastal vs. Inland Outdoor Kitchen Design: San Diego Climate Guide
San Diego's varied microclimates play a huge role in shaping every aspect of an outdoor kitchen's design. Knowing these conditions before you start can save you from expensive material damage and uncomfortable outdoor experiences.
Designing for Coastal vs. Inland Conditions
The key difference lies between coastal and inland areas. Coastal neighborhoods like La Jolla, Del Mar, and Oceanside enjoy mild summer temperatures, usually ranging from 72–77°F. However, the salty air is tough on materials, speeding up corrosion and finish deterioration - sometimes in just two years.
To combat this, coastal builds require durable materials. For instance, 316-grade stainless steel (marine-grade) is a must for cabinetry and hardware. Standard 304-grade stainless steel, commonly found in appliances, simply won't last in these conditions. Meanwhile, inland areas such as Escondido, Santee, and Poway experience much hotter summers, with temperatures often hitting 85–95°F from June through October. Here, the focus shifts to cooling strategies, like using heat-reflective materials and ensuring sufficient shade. Light-colored countertops and natural stone flooring, such as travertine, stay cooler in direct sunlight compared to darker materials like concrete.
| Factor | Coastal (e.g., La Jolla, Del Mar) | Inland (e.g., Escondido, Santee) |
|---|---|---|
| Summer Temp Range | 72–77°F | 85–95°F |
| Primary Challenge | Salt air corrosion and humidity | Intense UV exposure and extreme heat |
| Best Cabinetry | 316 Stainless Steel or HDPE | Powder-coated aluminum or stainless steel |
| Countertop Choice | Sealed granite or porcelain | Light-colored granite or concrete |
| Shade Importance | Moderate | Critical |
By factoring in these environmental differences, you can ensure your outdoor kitchen is both functional and built to last.
How to Pick the Right Spot for Your Outdoor Kitchen
Once you've chosen the right materials for your climate, the next step is finding the ideal location for your outdoor kitchen. Start by picking a spot as close to your home as possible. This not only makes grocery hauling easier but also saves $3,000–$7,000 in trenching costs for running utilities.
Pay attention to sun and wind patterns. Avoid west-facing areas that bear the brunt of harsh afternoon sun.
"Early morning sun can be pleasant; afternoon sun in San Diego in July is brutal. Plan for shade with a pergola, umbrella, or overhang." - John Thomas, San Diego Whole Home Remodeling
Spend time observing your yard during different parts of the day to understand how sunlight and wind move. Place your grill so that the wind carries smoke away from seating areas and your home. Coastal properties often benefit from stronger ocean breezes after sunset.
Drainage is another critical consideration. Water pooling around the base of your kitchen island can lead to long-term foundation damage. Installing a dedicated drain line, which typically costs about $500, can save you thousands in potential repairs.
Choosing Durable Materials for San Diego Outdoor Kitchens
Once you've picked the perfect spot for your outdoor kitchen and considered San Diego's sunny climate, the next step is selecting materials that can stand the test of time. The materials you choose will directly impact how long your kitchen lasts and how much effort you'll need to put into upkeep.
Countertops and Cabinets That Handle the Outdoors
With San Diego enjoying around 266 to 280 sunny days a year, choosing materials that resist UV damage is essential for countertops.
- Porcelain slabs and sintered stone are excellent options for San Diego's sun and heat. These materials resist stains, moisture, and don't require sealing, making them a low-maintenance choice.
- Granite is another durable option. While it handles heat and sunlight well, it does require sealing once a year to protect against stains. Expect installation costs to range between $85 and $165 per square foot.
On the flip side, steer clear of quartz countertops. The resin binders in quartz tend to warp, yellow, or delaminate when exposed to UV rays. In fact, many manufacturers won't even honor warranties if quartz is used outdoors. Similarly, materials like wood, laminate, and marble are prone to weather-related damage and aren't ideal for outdoor use.
"An outdoor kitchen countertop is not a finish choice you make at the end of the project. It is a performance decision that affects how your kitchen handles San Diego's heat, UV exposure, grease, and salt air." - Luke Whittaker, Founder & Owner, Install-It-Direct
For cabinets, marine-grade polymer (HDPE) and 316-grade stainless steel are top picks. HDPE is water-resistant, termite-proof, and won't delaminate, plus it comes in a variety of colors. Avoid wood framing - it doesn't hold up well in San Diego's mix of moisture and termite-prone conditions, often leading to swelling, warping, or rot. For the structural base of your island, concrete masonry units (CMU) provide a sturdy, fire-resistant foundation.
Once you've nailed down durable surfaces and cabinets, it’s time to turn your attention to outdoor appliances designed to thrive in these conditions.
What to Look for in Outdoor-Rated Appliances
After choosing materials that can handle the elements, focus on appliances specifically built for outdoor use. San Diego's temperature swings, direct sunlight, and coastal salt air demand equipment designed for durability.
- Opt for outdoor-rated appliances with finishes that resist corrosion, especially for grills, hardware, and fasteners exposed to salty air.
- Use outdoor-rated refrigerators and beverage coolers. Indoor models aren't made to withstand backyard heat and direct sunlight, which can lead to early breakdowns.
- For high-powered cooking, look for burners that deliver at least 30,000 BTUs. These are ideal for tasks like wok cooking or boiling large amounts of liquid.
When planning your layout, make sure to finalize appliance dimensions early. For grills, leave at least 12–18 inches of clear countertop space on both sides to ensure a functional workspace.
Lastly, consider your kitchen's total energy needs during the design phase. A premium grill can produce over 80,000 BTUs, and a fully equipped outdoor kitchen may require more than 200,000 BTUs. This could exceed your home's existing gas meter capacity. Addressing power requirements early can save you from unexpected utility upgrades later.
Planning a Functional Outdoor Kitchen Layout
Once you've picked out the materials and appliances, the next step is designing a layout that ensures smooth cooking and entertaining. A well-thought-out layout isn't just about aesthetics - it's about minimizing unnecessary movements and keeping your guests comfortable while you work your culinary magic.
"A luxury outdoor kitchen is not about stacking appliances in a stone island. It is about optimize the cooking workflow so the cook has workspace, guests stay comfortable, and the layout integrates with the patio, shade structure, and fire feature around it." - Luke Whittaker, Founder & Owner, Install-It-Direct
Organizing the Grill, Prep, and Serving Areas
To make your outdoor kitchen practical and efficient, divide it into four key zones: prep (countertops), cooking (grill and burners), cleaning (sink and trash), and serving (bar seating or dining area). A well-zoned kitchen keeps everything you need within reach and ensures a logical flow from food prep to serving.
Start with the grill as the centerpiece of the cooking zone, making sure to leave 12–18 inches of counter space on either side for trays and tools. Position the sink near the prep area to avoid unnecessary trips across the kitchen. For guest convenience, place beverage refrigerators at the edge of the layout, away from the cooking zone, so they can grab drinks without interfering with the chef.
To ensure safety and comfort, maintain a 42–48 inch working aisle. This space allows the cook to step back from the grill while others pass by freely. If you're near the coast, orient the grill to direct smoke away from seating areas, taking advantage of natural breezes.
For counter heights, stick to 36 inches for prep surfaces (the same as indoor kitchens) and 42 inches for bar seating, which pairs well with standard-height stools.
These basic principles provide a solid foundation for customizing your design to fit your backyard's size and layout.
Layout Tips for Small and Large Backyards
Once you've organized your cooking zones, adapt the design to suit the available space in your yard. Here’s how different layouts compare:
| Layout | Footprint | Best For | 2026 Estimated Cost (San Diego) |
|---|---|---|---|
| Straight Island | 8–12 linear ft | Small patios, urban yards | $15,000 – $30,000 |
| L-Shape | 12–18 linear ft | Most San Diego backyards | $25,000 – $50,000 |
| U-Shape + Bar | 16–26+ linear ft | Large properties, serious entertainers | $45,000 – $80,000+ |
For smaller spaces, like those in Pacific Beach or Hillcrest, a straight island works best. Position it along the perimeter to keep the patio open and functional. Compact appliances, like under-counter refrigerators and combination grill-burner units, maximize utility in these tighter areas.
For larger properties in neighborhoods like La Jolla, Del Mar, or Poway, an L-shape or U-shape layout offers more flexibility. These designs let you separate cooking and entertaining zones, creating a spacious hub for hosting. The U-shape is ideal for frequent entertainers, allowing multiple people to cook simultaneously without crowding. Just remember to plan utility trenches early - retrofitting gas, electrical, and plumbing lines into finished hardscaping can add thousands to your budget.
Key Features and Upgrades to Include in Your Outdoor Kitchen
After finalizing your layout, the next step is deciding which features will make your outdoor kitchen functional for daily use while also enhancing your entertaining game. Some elements are must-haves for cooking, while others are all about creating memorable experiences for your guests.
Built-In Features for Everyday Cooking
When designing a San Diego outdoor kitchen, there are six essential elements to include:
- Built-In Grill: A 36-inch grill is a great size for most families, but if you host larger gatherings often, a 42-inch model might be a better fit. Choose your grill model early, as its dimensions will dictate your kitchen’s overall design. Don’t forget to leave 12–18 inches of countertop space on either side for prep and safety.
- Outdoor-Rated Refrigerator: Go for a UL-approved, outdoor-rated fridge to ensure it can handle San Diego’s climate while seamlessly integrating into your kitchen design.
- Outdoor Sink: A sink is a must for food prep and cleanup. It needs a dedicated water supply and proper drainage connected to your home’s sanitary system to stay compliant with local regulations.
- Weather-Resistant Cabinets: Materials like stainless steel, marine-grade polymer, or HDPE are great choices since they resist moisture and salt air, which are common in coastal areas.
- Trash Pull-Out Drawers: Built-in double drawers keep your space organized and eliminate the need for standalone trash bins.
| Feature | Why It Matters |
|---|---|
| 36"–42" Built-In Grill | Acts as the main cooking station; size depends on your entertaining needs |
| Outdoor-Rated Refrigerator | Handles San Diego’s weather while keeping food and drinks cool |
| Outdoor Sink | Essential for prep and cleanup; must meet local plumbing codes |
| Weather-Resistant Cabinets | Protects tools and supplies from the elements |
| Adequate Landing Space | Provides 12–18 inches of countertop on each side for safe, efficient prep |
| Trash Pull-Out Drawers | Keeps the area tidy and clutter-free |
These features are the backbone of any outdoor kitchen, designed to meet both everyday cooking needs and the unique challenges of San Diego’s weather. Once you’ve got these essentials in place, you can start thinking about upgrades to take your space to the next level.
Upgrades Worth Considering for Entertaining
If you want to turn your outdoor kitchen into a true entertainment hub, here are some upgrades to consider:
- Pizza Oven: Whether you go for a wood-fired or gas model, a pizza oven doubles as a roasting and baking station, making it a hit with guests.
- Dedicated Beverage Center: Add a wine cooler, kegerator, or drop-in ice bin to keep drinks flowing without crowding your cooking area. Placing these on the outer edge of your kitchen ensures easy access for guests.
- Fire Features: For those cooler evenings, a fire pit or outdoor fireplace can extend your gatherings. Prefabricated gas fire pits typically cost between $2,500 and $5,000, while custom-built masonry options can exceed $25,000.
- Climate Control Features: If you live in warmer inland areas like Santee or El Cajon, a misting system or ceiling fan under a pergola can make those hot days more comfortable for everyone.
"Outdoor kitchens in San Diego face unique conditions, from early morning moisture to ocean air and intense sun. The materials you choose must handle it all without fading, warping, or rusting." - Kaminskiy Design & Remodeling
For an extra layer of convenience, consider adding smart technology. Wi-Fi-enabled grills and outdoor-rated refrigerators that sync with your phone let you monitor temperatures and manage multiple dishes with ease during gatherings.
Adding Shade, Lighting, and Weather Protection to Your Outdoor Kitchen
Protecting your outdoor kitchen with shade, proper lighting, and weather-resistant features is a smart way to maximize its use throughout the year. San Diego’s sunny weather is perfect for outdoor living, but it can be tough on both people and materials. Adding these elements not only improves comfort but also extends the life of your investment.
Shade Options for San Diego's Sunny Weather
Choosing the right shade solution depends heavily on where you live in San Diego. Coastal areas like La Jolla and Ocean Beach tend to have mild temperatures, averaging 72–77°F, but the sun’s UV rays can still cause wear and tear over time. Inland regions such as Escondido, Santee, and El Cajon often experience hotter conditions, with summer temperatures reaching 85–95°F. For these areas, effective shade is a must.
- Coastal Properties: Aluminum pergolas are a fantastic choice. They require little upkeep and resist corrosion from salty air.
- Inland Yards: Cedar or redwood pergolas provide a natural, inviting look but need resealing every 2–3 years to maintain their durability.
- West-Facing Lots: If your property faces west, prioritize maximum shade coverage to block San Diego’s intense afternoon sun.
When designing your outdoor kitchen, plan the shade structure alongside the kitchen layout. This ensures that posts won’t interfere with the placement of your kitchen island or utility lines. Additionally, if your grill is under a covered area, keep at least 8 to 10 feet of vertical clearance to safely handle heat and smoke.
"Design kitchen and shade together. Post locations, fire clearances, and utility routes on one drawing." - Luke Whittaker, Founder & Owner, Install-It-Direct
Once shade is in place, focus on lighting and material protection to create a comfortable and functional space year-round.
Lighting and Material Protection for Year-Round Use
To make your outdoor kitchen usable after sunset, a well-thought-out lighting plan is essential. Layering different types of lighting not only ensures safety but also enhances the overall atmosphere.
| Lighting Type | Purpose | Where to Use It |
|---|---|---|
| Task | Provides visibility and safety for cooking | Over the grill, prep counters, and sink |
| Ambient | Sets a cozy, inviting mood | Use string lights, wall sconces, or recessed pergola fixtures |
| Accent | Highlights design features | Add under-counter LED strips or landscape uplights |
Before installing patio surfaces, run underground electrical conduit and low-voltage wiring to avoid costly disruptions later. All electrical components should comply with California’s code requirements, including GFCI-protected circuits. Near the coast, opt for fixtures made from powder-coated aluminum or high-grade stainless steel to prevent corrosion from salty air.
For countertops, materials like granite, sealed concrete, or porcelain slabs perform well under San Diego’s sun and coastal conditions. When selecting cabinetry and hardware, stick to options designed specifically for outdoor use to withstand the elements.
"Always choose materials rated for exterior use - especially in coastal areas like San Diego. Salt air, sun exposure, and moisture can wear down indoor-grade materials fast." - Kimberly Villa, Operations Manager, Kaminskiy Design and Remodeling
Conclusion: Building the Right Outdoor Kitchen for San Diego Living
Creating an outdoor kitchen in San Diego means factoring in the area's sunny climate, choosing durable materials, and designing a layout that works efficiently for your space. With proper planning, your outdoor kitchen can thrive in San Diego's environment while enhancing your home's value.
San Diego's year-round sunshine and strong property market make an outdoor kitchen not just a luxury but a smart investment. By using materials suited for the climate and focusing on functional layouts, you can create a space that blends style and practicality.
However, there are challenges to watch out for. Issues like gas line capacities, permit requirements, HOA approvals, and appliance spacing can complicate the process. These are areas where professional expertise is invaluable. For instance, permit processing and HOA reviews often take longer than expected, so it's crucial to build extra time into your plans.
"In San Diego's competitive 2025 market, properties with exceptional outdoor spaces command premium prices and sell faster than comparable homes without these features." - United Turf & Pavers
To simplify the process, United Turf & Pavers (CA CSLB #1138157) offers free on-site consultations. Their services include professional measurements, site evaluations, and material samples to ensure your design aligns with your home's architecture and backyard conditions. Take advantage of their expertise to create an outdoor kitchen that enhances your outdoor living experience.
FAQs
Do I need permits for an outdoor kitchen in San Diego?
When planning a project in San Diego, whether you need a permit depends on what you're doing. For example, if you're setting up a simple freestanding grill on an existing patio, you're likely in the clear. But if your project involves installing new gas lines, plumbing, or electrical work, you'll probably need a permit. Adding a roofed structure? That definitely requires a building permit.
Things can get trickier if your property is in a Coastal Overlay Zone, Historic District, or a Very High Fire Hazard Zone, as these areas often come with additional regulations. And don’t forget to check in with your local HOA - they might have their own approval processes you’ll need to navigate.
How do I protect an outdoor kitchen from coastal salt air?
To shield your outdoor kitchen from the effects of coastal salt air, it's essential to select materials specifically made for outdoor and coastal conditions. Look for marine-grade stainless steel (316 grade) or HDPE polymer when choosing appliances and cabinetry, as these materials resist rust and corrosion. For countertops, go with sturdy, non-porous options such as granite or poured concrete, which can handle the harsh environment. Lastly, make sure to use sealed, coastal-grade fasteners and hardware to maintain the kitchen's structural integrity over time.
What utilities (gas, water, power) should I plan for upfront?
Before construction kicks off, careful planning of utilities is a must. Placing your outdoor kitchen close to existing gas, water, and electrical lines can help keep costs under control.
- Gas Lines: Ensure the gas lines are capable of handling the BTU demands of your grills and burners.
- Water Supply and Drainage: Trenches for water supply and drainage should be installed before you lay down any pavers.
- Electrical Wiring: Permanent electrical wiring is essential for powering lighting and appliances.
Lastly, don’t forget to check your local permit requirements. Gas, plumbing, and electrical installations often require approval to ensure everything is up to code.