.webp)
Landscape Lighting Ideas for San Diego Backyards
June 14, 2026
The short answer: if you want a San Diego backyard to work well at night, you start with paths and steps, add a few plant or wall accents, then finish with patio, pergola, or kitchen lighting. That gives you a yard that feels safe, easy to use, and calm after dark.
San Diego gets 280+ dry nights per year, so backyard lighting does more than make a yard look nice. It helps me use the space more often, avoid dark steps and edges, and show off things like agave, stucco walls, stone, pergolas, and mature trees. In most cases, warm LED lighting at 2700K to 3000K works best, and coastal homes need fixtures that can hold up near salt air.
If it had to boil the whole plan down, do this:
- Light walkways first with low path lights
- Add step lights at stairs and grade changes
- Use uplights or grazing for plants, trees, boulders, and walls
- Hang string lights over patios or pergolas for soft overhead light
- Add task lighting at grills and outdoor kitchens
- Keep it warm, selective, and layered instead of lighting every inch
We’d also keep spacing and placement simple:
- Path lights are often 14 to 24 inches tall
- Many paths look best with lights spaced about 6 to 8 feet apart
- In gravel or decomposed granite, spacing can stretch to 8 to 10 feet
- Moonlighting fixtures are often set 15 to 20 feet high in tree canopies
- Dust can cut fixture output by 10% to 20%, so cleaning matters
Here’s the main takeaway: good backyard lighting is not about more fixtures. It’s about putting the right light in the spots people use most. The rest of the article breaks that down by safety, plant lighting, patio mood, and cooking or seating areas.
DIY Outdoor Landscape Lighting: FASTEST & EASIEST Installation I’ve EVER Done! | POV Ep. 25
sbb-itb-2b3b7d5
How to Match Landscape Lighting to Your Backyard Layout
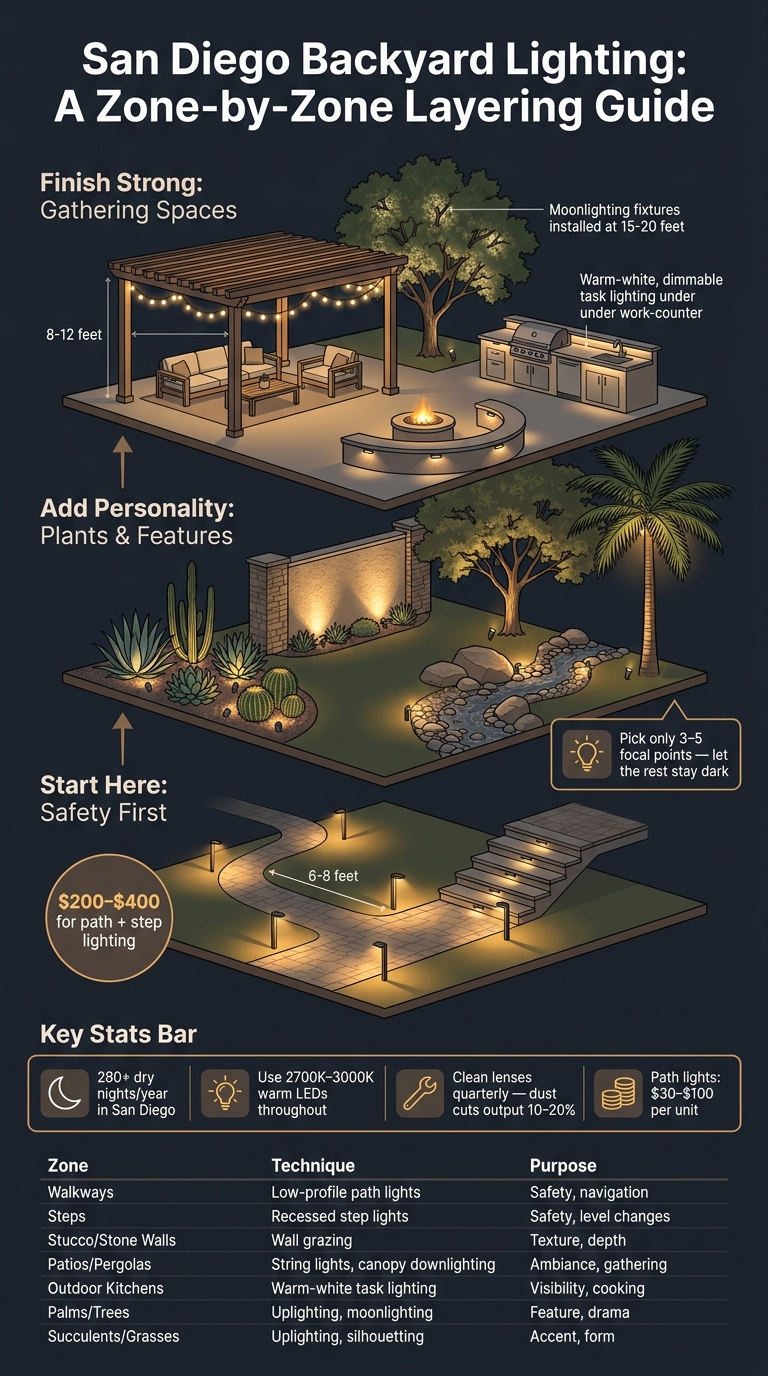
San Diego Backyard Lighting: A Zone-by-Zone Layering Guide
Plan backyard lighting by zone. Circulation paths, focal points, gathering areas, and daily-use spaces each need a different kind of light.
Start with safety first: steps, level changes, pool edges, and walkways. After that, add accent lighting for plants and walls. Then bring in ambient lighting for patios and dining areas. That layered approach helps you avoid a flat, overlit yard. It also gives you a simple map for choosing the right fixtures in each part of the backyard.
Coastal properties need marine-grade fixtures that can handle salt air and moisture. Inland yards do well with LED fixtures, which run cooler and last much longer than halogen. For a softer San Diego look, use warm-white LEDs in the 2700K–3000K range.
Plant shape and wall texture should guide the lighting method. Drought-tolerant plants like agave and manzanita have strong, sculptural forms, so they tend to look best with low-angle spotlighting or by silhouetting them against stucco walls. Stucco also responds well to wall grazing. That means placing a fixture close to the wall so the light skims across the surface and shows off its texture. Palms and mature oaks usually need uplighting or downlighting through the canopy to build depth and shadow at ground level.
Use this table to match each backyard zone to the right lighting method:
| Zone | Recommended Technique | Purpose |
|---|---|---|
| Walkways | Low-profile bollard or mushroom-style path lights | Safe navigation |
| Steps & level changes | Recessed step lights in risers or under-cap rail lights | Visibility at transitions |
| Stucco or stone walls | Wall grazing or wall washing | Highlights surface texture |
| Patios, pergolas, and fire pits | Tensioned string or bistro lights, or under-cap rail lights | Relaxed ambient atmosphere |
| Outdoor kitchens or grill stations | Task lighting | Better cooking visibility |
| Palms and focal trees | Uplighting or downlighting through the canopy | Canopy effect and depth |
| Succulents & ornamental grasses | Low-angle spotlighting or silhouetting | Emphasizes sculptural form |
Next, each zone breaks down into the lighting jobs that matter most.
1. Circulation & Safety
Start with the routes you use most: paths, steps, and level changes.
Pathway lights come first. After you map the yard by zone, light the routes people use every night before anything else. Low-profile path lights with shielded tops throw light onto walkways without harsh glare. Place fixtures 14 to 24 inches high, and stagger them on alternating sides of the path every 6 to 8 feet so the yard doesn’t look like an airport runway. In San Diego yards, decomposed granite or gravel can bounce light well enough to stretch spacing to 8 to 10 feet. Low-voltage fixtures usually cost $30 to $100 per unit, plus the cost of a transformer.
Then move to steps and grade changes. These spots need light after dark because they’re easy to miss, even in a familiar yard. Recessed or low-profile step lights make transitions easier to see without sticking out visually. Use them on stair risers, deck steps, and side-yard transitions. Path and step lights together usually cost $200 to $400.
2. Plant & Feature Highlighting
Once safety is covered, turn your attention to the plants and stonework that give the yard its personality.
| Feature | Best Technique |
|---|---|
| Agave, Aloe, Mexican Fence Post | Uplighting or silhouetting |
| Manzanita, Toyon, California Oak | Uplighting or downlighting |
| Boulders, Stone Walls | Grazing |
| Dry Creek Beds, River Rock | Low-angle edge lighting |
| Deer Grass, Muhly Grass | Backlighting |
For agave and aloe, place a warm 2700K uplight at the base or just behind the plant to create a crisp silhouette. With Mexican fence post cactus, a single uplight is often enough to show off its tall, upright shape.
Stone features respond well to grazing. When light skims across boulders and walls, it brings out cracks, color changes, and surface depth. Along dry creek beds, low-profile fixtures set at the edges can catch polished river rock and give the scene a sense of motion after dark.
3. Ambient Gathering Light
Once paths and key features are lit, the next step is the spaces where people actually sit, eat, and hang out. That means patios, pergolas, dining areas, and fire pits.
This layer helps seating areas feel comfortable after dark instead of dim or harsh.
- Pergola and Patio String Lights String lights are one of the fastest ways to define a patio or pergola and make the space feel more inviting. Hang them 8 to 12 feet high, and use a galvanized support cable before you install the strands so they stay taut in Santa Ana winds. Go with 2,700K to 3,000K LED bulbs for a warm glow. A dimmer or smart controller also helps, since you can dial the light up for dinner or tone it down for a quieter evening.
- Moonlighting Through Tree Canopies If you want something softer, moonlighting is a good fit for yards with mature trees. In landscapes with mature oaks, eucalyptus, or pepper trees, fixtures mounted 15 to 20 feet high in the canopy cast dappled light below. The effect is gentle and natural, with a soft glow over seating areas.
4. Functional Outdoor Living
Once ambient lighting sets the tone, task lighting does the practical work. It puts light where people cook, sit, and gather without washing out the atmosphere.
- Low-Profile Accent Lights for Fire Pits and Seating Walls Around fire pits and seating walls, softer light helps people move around with less strain while keeping the flame as the main focal point. Low-profile accent lights along seating walls add visibility without taking over the space. If you host events and want more control, app-based dimming makes it easy to shift the light level as needed.
- Outdoor Kitchen Task Lighting An outdoor kitchen needs focused light for prep and cooking. Warm-white LEDs in the 2,700K to 3,000K range help the area feel inviting, and dimmable fixtures let you turn things up while cooking and tone it down for dinner.
These fixtures help close the last gaps in the plan before you settle on the final mix of beauty, safety, and function.
Choosing the Right Mix of Lights for Beauty, Safety, and Function
Once you’ve picked fixtures by zone, step back and look at the yard as a whole. The goal isn’t to scatter lights everywhere. It’s to layer them so the space feels good to walk through, easy to use, and pleasant to look at. One fixture can’t do all of that on its own.
Think in terms of layers of light:
- Safety lighting for paths and steps
- Accent lighting for standout features
- Ambient or task lighting for seating, dining, and other hangout spots
A simple way to build the plan is to go in stages:
- Light paths and steps first.
- Add 3 to 5 focal accents.
- Finish with ambient or task lighting where people gather.
Keep the accents selective. Pick 3 to 5 focal points - like an oak, agave, or stone wall - and let the rest of the yard play a supporting role. That contrast matters. A little darkness between lit areas adds depth and keeps the space from looking flat or overlit.
Color temperature also helps tie everything together. Use one warm color temperature across the yard, ideally 2,700K to 3,000K. That keeps the lighting consistent and easy on the eyes.
If you’re not doing the whole job at once, phase it out:
- Start with paths and safety lighting
- Then add feature lighting
- Finish with string lights and controls
Maintenance is easy, but it matters. Wipe fixture lenses quarterly. In San Diego, dust can cut light output by 10% to 20%.
Conclusion
A well-lit San Diego backyard isn't about flooding the space with light. It's about putting the right light in the right place so the yard feels safe, easy to use, and pleasant after dark. The goal is balance. And that usually comes from layering light based on how the space is used, not from stuffing the yard with more fixtures.
The strongest plans combine pathway lighting, accent lighting, and ambient or task lighting. Each one has its own job, and together they help the yard feel balanced instead of harsh or cluttered.
The best setups usually come from a small number of well-placed fixtures, not a packed yard.
In San Diego, it makes sense to focus first on the areas people use most. Then add accent and task lighting only where it helps the space work better.
Start with paths and one or two focal points, then add only what the space needs.
FAQs
How many backyard lights do I need?
The right number of backyard lights comes down to two things: the size of your yard and what you want to light up.
It helps to be selective. Too many lights can make the space feel harsh instead of warm and inviting.
As a general guide:
- 50–200 lumens for path lights
- 200–400 lumens for accent lighting and plant uplighting
- 400–800 lumens or more for large trees
What lighting works best near the coast?
Near the coast, marine-grade fixtures built to last tend to work best. Good picks include low-profile bollard lights, mushroom-style path lights, and weather-rated string lights with shatterproof bulbs.
These materials help stand up to coastal moisture and salt air while giving the space a relaxed evening feel.
Can I install landscape lighting in phases?
Yes. You can install landscape lighting in phases to fit your budget and your plans.
That gives you room to improve your backyard over time instead of doing everything at once. You might start with a few key areas, then add more lighting later as your needs change.
A phased setup can help with:
- Budget control: spread costs over time
- Better planning: focus on the spots that matter most first
- Usability and safety: add light where you need it now, then build from there
If you want a plan that fits your San Diego backyard, it helps to talk with a professional. They can map out each phase so the lighting works well together from the start.