.webp)
.webp)

Flagstone Patios in San Diego: Cost and What to Expect
July 12, 2026
A flagstone patio in San Diego usually costs $15 to $55 per square foot, and a 20 x 20 patio often lands around $6,000 to $12,800.
Your final price depends less on the stone alone and more on base prep, drainage, soil, slope, access, and permits. Inland yards with clay soil often need deeper excavation, while hillside lots, demo work, and drainage fixes can add $1,000 to $15,000+ to the job.
Before you review quotes, focus on these points:
- Installed cost: about $15 to $55 per sq. ft.
- Stone cost: about $6 to $18 per sq. ft.
- Labor: about $9 to $17 per sq. ft.
- Drainage fixes: about $1,000 to $4,000
- French drains: about $35 to $55 per linear foot
- Permits: about $300 to $1,200
- Timeline: often 2–4 weeks for build time and 6–12+ weeks total with planning and permits
- Best fit for many inland yards: dry-laid flagstone, since it handles soil movement better than rigid slab systems
You should also expect quotes to vary based on:
- Stone type and pattern
- Yard slope and runoff
- Coastal vs. inland conditions
- Tight access that adds 10% to 25% in labor
- Old patio removal
- HOA review delays of 30 to 60 days
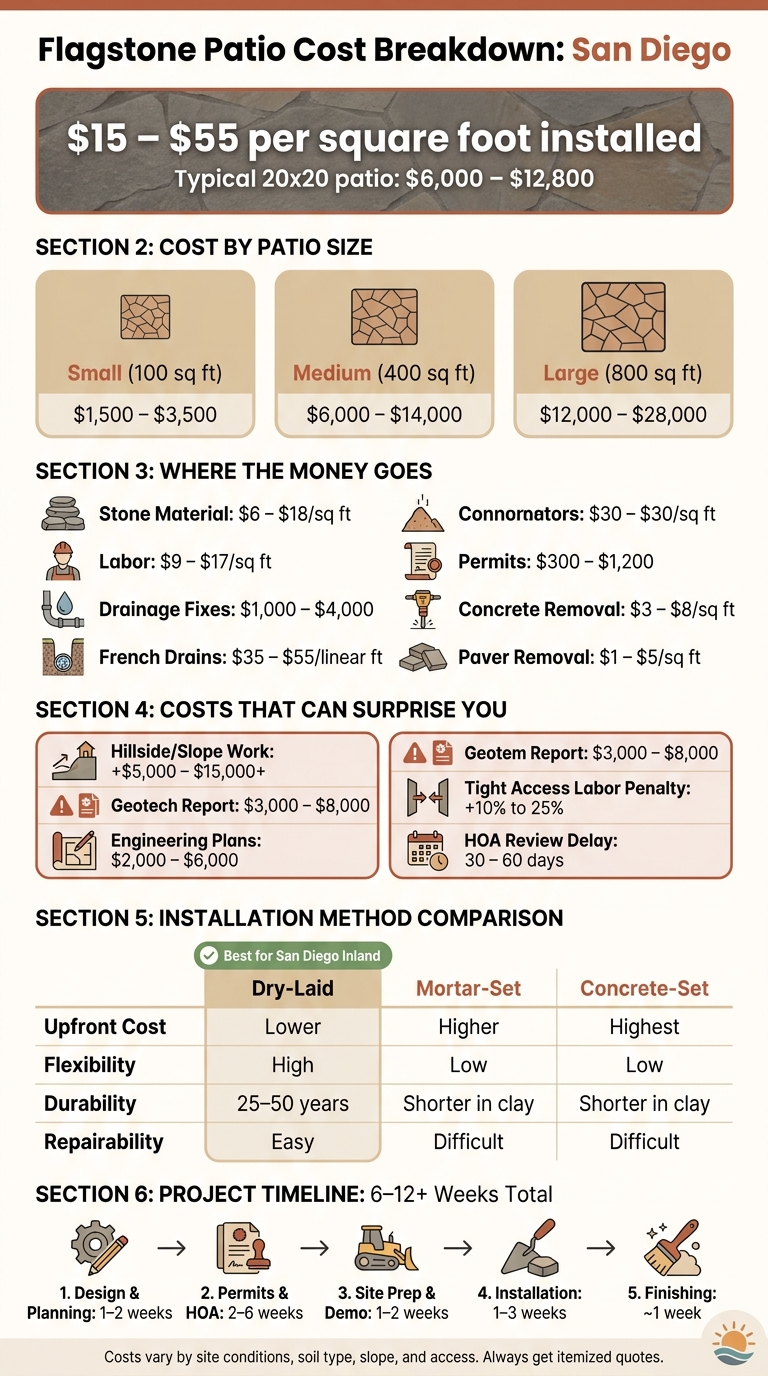
Flagstone Patio Cost Breakdown: San Diego 2024 Guide
This mistake cost me $800 on a flagstone patio project #flagstonepatio
sbb-itb-2b3b7d5
Quick Comparison
| Item | Typical San Diego Range | What changes the price |
|---|---|---|
| Flagstone patio install | $15–$55/sq. ft. | Stone, labor, base depth, drainage |
| 100 sq. ft. patio | $1,500–$3,500 | Small-job minimum charges |
| 400 sq. ft. patio | $6,000–$14,000 | Soil, layout, access |
| 800 sq. ft. patio | $12,000–$28,000 | Slope, demo, drainage |
| Drainage work | $1,000–$4,000 | Runoff issues, discharge route |
| Concrete removal | $3–$8/sq. ft. | Thickness and haul-away |
| Paver removal | $1–$5/sq. ft. | Access and disposal |
| Geotech report | $3,000–$8,000 | Hillside and overlay zones |
| Engineering plans | $2,000–$6,000 | Retaining walls and permit needs |
Bottom line: you should budget for the patio surface and the hidden work under it, because excavation, drainage, edging, and haul-away often decide whether the patio lasts or turns into a repair job.
1. Flagstone Patio Costs in San Diego
For planning purposes, most standard installs tend to land in the middle of the range. If you go with higher-end stone or a concrete-set install, expect $32 to $55 per square foot.
Installed price ranges by patio size
The table below shows realistic planning numbers for San Diego County. Final cost will depend on the site, the type of stone, and how much work the project calls for.
| Patio Size | Typical Square Footage | Likely Installed Price Range (San Diego) |
|---|---|---|
| Small (Bistro/Entry) | 100 sq. ft. | $1,500–$3,500 |
| Medium (Entertaining) | 400 sq. ft. | $6,000–$14,000 |
| Large (Full Backyard) | 800 sq. ft. | $12,000–$28,000 |
Note: Small projects often end up near the top of the per-square-foot range because of contractor minimum mobilization fees and fixed site prep costs [7][1].
Where the money goes: materials, labor, and base work
A typical estimate usually covers excavation, base material, stone, labor, joint fill, and edging.
Flagstone material usually costs $6 to $18 per square foot, while installation labor often falls between $9 and $17 per square foot. On top of that, you’re also paying for a compacted gravel base, bedding sand, joint fill, and edge restraints.
Drainage fixes can add $1,000 to $4,000, and French drains are often priced at $35 to $55 per linear foot. If there’s an old patio in the way, removal adds another line item. Paver removal usually runs $1 to $5 per square foot, while concrete removal tends to cost $3 to $8 per square foot.
Add-ons that raise the total price
Optional features can push the total up fast, especially on larger backyard projects. The most common upgrades San Diego homeowners add after planning the base patio are steps, seat walls, lighting, and fire features.
| Add-On Feature | Estimated Cost |
|---|---|
| Built-in Seating Wall | $1,500–$5,000 |
| Outdoor Lighting (per fixture) | $80–$300 |
| Gas Fire Pit (Prefabricated) | $2,500–$5,000 |
| Steps (Precast Concrete) | $500–$3,000 |
| Aluminum Pergola (Installed) | $20–$30 per sq. ft. |
| BBQ Island (Basic) | $8,000+ |
Those numbers tend to shift the most based on stone choice, site conditions, and how easy the crew can access the yard.
2. Factors That Affect Price and Results
Two flagstone patios can have the exact same square footage and still end up thousands of dollars apart in final cost. Why? The biggest drivers are usually the stone you pick and the conditions on the site. Those two things affect labor, engineering, and permit needs.
Stone type, thickness, shape, and layout pattern
The stone itself is one of the biggest pricing variables. Irregular flagstone takes more time to install than cut stone because crews have to sort, trim, and level each piece. It’s a bit like putting together a puzzle where no two pieces behave the same way.
Custom patterns and curved borders also push costs up. In many cases, they add $2 to $6 per square foot.
Slope, drainage, and coastal versus inland conditions
Slope can change a patio budget fast. A hillside lot in places like Mission Hills or Tierrasanta may need grading, retaining walls, or geotechnical reports. That alone can add five figures to the project total.
Geotechnical reports for hillside overlay zones often cost $3,000 to $8,000. If retaining walls over 3 feet tall are part of the job, PE-stamped engineering plans may also be required, which can add another $2,000 to $6,000.
Location within San Diego matters too. Coastal properties need denser stone and proper sealing to help limit moisture issues and efflorescence. Inland areas like Escondido or Santee deal with intense heat, often 85°F to 95°F, so lighter-colored stones usually make more sense because they stay cooler underfoot.
Those conditions don’t just affect comfort. They also shape the base prep and drainage work needed so the patio holds up over time.
Access, demolition, and permit considerations
Access is another thing that can quietly drive up labor costs. In older, dense neighborhoods like North Park or Normal Heights, narrow side yards may block machine access. When crews have to hand-carry stone, base material, or debris instead of using equipment, labor costs can climb by 10% to 25%.
Demolition is a separate cost to plan for. Removing old concrete or exporting soil can add $5,000 to $15,000+ to the total project price.
Permits are also worth checking early, not halfway through the job.
- In the City of San Diego, homes that are 45 years or older may need Historic Resources Board review for exterior work that requires a permit.
- Work involving a driveway apron, curb, or gutter also needs a City right-of-way permit.
- Permit fees usually range from $300 to $1,200, depending on the scope of work.
- In master-planned communities, HOA review can add 30 to 60 days before work starts.
These site conditions also affect the excavation, base depth, and drainage work covered next.
3. Site Prep, Base Installation, and Drainage
The stone is what people notice first. But the part that decides how long the patio lasts is the part you don’t see.
If the base isn’t compacted the right way, the patio can sink, shift, or crack over time. That hidden layer is what keeps the surface level and helps water drain where it should. It’s also one of the first places low bids shave costs.
Excavation, grading, and base depth
Dig depth depends a lot on the soil under the patio.
Sandy soils usually need 6–8 inches of excavation. Clay-heavy soils often need 8–12 inches because clay swells when it gets wet and shrinks when it dries out.
After excavation, crews place geotextile fabric over the subgrade before adding base material. On clay soil, this step isn’t optional. The fabric stops the clay from blending into the crushed rock base and weakening it.
Above that goes compacted Class II road base, placed in 2-inch lifts and compacted with a plate compactor after each pass. For a standard foot-traffic patio, that means at least 4 inches of compacted base material.
Drainage slope and runoff control
Once the base is compacted, the next step is simple in theory: get water away from the patio and away from the house.
The finished patio surface should slope away from the house at 1–2% - about 1/8 to 1/4 inch per foot. That slight pitch helps water run off instead of sitting near the foundation. It doesn’t sound like much, but that small angle does a lot of work.
On hillside lots or properties with heavy runoff, a basic slope may not be enough. In those cases, French drains or catch basins can intercept water before it reaches the patio edge. And before that work begins, it’s smart to confirm where the water will end up. In San Diego, routing runoff to the street curb calls for a Public Right-of-Way permit.
Edging and joint details that keep stone in place
A flagstone patio also needs a firm border. Without it, the outer stones can slowly spread over time.
Edge restraints hold those perimeter stones in place and help keep the whole patio field from moving, which protects both the look of the patio and its structural integrity. This is one of those small details that can seem easy to skip on a cheap bid. Later, though, it often shows up as gaps, drifting stones, and uneven edges.
The joints between stones matter just as much:
- For dry-laid patios, polymeric sand is the standard option. It’s swept into the joints and activated with water, where it hardens into a firm but slightly flexible filler. That helps resist weeds and ants while still allowing slight movement.
- Mortar-set patios use mortar joints instead. Those joints are more rigid, so they can crack if the base shifts.
- Some dry-laid patios use decomposed granite (DG) fines, but those joints usually need more upkeep.
These base and edge details also shape the installation method, the final finish, and the amount of maintenance the patio will need over time.
4. Installation Methods, Timeline, and Maintenance
Once the base and drainage are in place, the next decision is how the stone goes in. That one choice shapes how the patio holds up over time, not just how it looks right after the crew leaves. The three main methods each come with trade-offs in price, movement, and upkeep.
Dry-laid vs. mortar-set vs. concrete-set flagstone
Dry-laid flagstone sits on a compacted gravel and sand base without adhesive. Because the stones can move a little with the ground, this method works well in San Diego inland areas like Eastlake, Poway, and Santee, where expansive clay soil swells and shrinks as moisture changes. If one stone settles, it can usually be reset without tearing up the whole patio. When installed the right way, dry-laid systems can last 25–50 years.
Mortar-set and concrete-set systems attach the stone to a rigid concrete slab. That gives the patio a cleaner, tighter look. But there’s a catch: rigid slabs don’t handle clay soil movement very well, so they crack more easily when the ground shifts. Repairs are also tougher, and patched mortar joints often don’t match the original color.
| Feature | Dry-Laid | Mortar-Set | Concrete-Set |
|---|---|---|---|
| Upfront Cost | Lower | Higher | Highest |
| Flexibility | High; moves with soil | Low; rigid | Low; rigid |
| Durability | 25–50 years | Shorter lifespan in clay soil | Shorter lifespan in clay soil |
| Repairability | Easy | Difficult | Difficult |
| Drainage | Permeable; some water infiltrates | Non-permeable; relies on surface slope | Non-permeable; relies on surface slope |
| Appearance | Natural, rustic; wider joints | Formal; tight mortar joints | Formal; tight mortar joints |
Rigid systems are less forgiving in clay soils and harder to patch cleanly.
For many San Diego properties, especially inland ones, dry-laid is often the better long-term fit.
The install method also changes the project schedule and the kind of maintenance you’ll deal with later.
How long the project takes
Active construction for a standard backyard patio usually takes 2–4 weeks. But the full project often runs 6–12+ weeks once design, permits, and HOA review are part of the picture.
| Project Phase | Typical Duration | What Happens |
|---|---|---|
| Design & Planning | 1–2 weeks | Site assessment and material selection |
| Permits & HOA | 2–6 weeks | City permit processing and HOA review if required |
| Site Prep & Demo | 1–2 weeks | Demolition, excavation, and utility marking via DigAlert |
| Installation | 1–3 weeks | Base compaction, stone laying, and joint finishing |
| Finishing | About 1 week | Joint sand activation, sealing, and final cleanup |
San Diego weather helps more than it hurts. The area averages 263 to 266 sunny or partly sunny days each year, so weather delays are usually limited. What tends to slow things down is access. If a crew has to move stone through a narrow side yard by hand, labor costs can climb by 10%–20%. HOA review can also drag out the start date, especially when boards meet only once a month. Winter rain can still pause work.
Finished appearance and ongoing maintenance
A finished flagstone patio has natural color variation, surface texture, and that textured, outdoorsy look many homeowners want. Lighter stone usually stays cooler underfoot than darker stone or concrete. That matters in San Diego summers. If the material isn’t chosen with heat in mind, stone surfaces can hit 150°F in August.
Maintenance is pretty simple. Sweep it often, rinse it with a garden hose when needed, and add joint sand once a year on dry-laid patios to keep the surface firm and help cut down on weeds. Sealing every 2–3 years helps protect against UV fading, staining, and surface wear. Near the coast, salt air can also lead to efflorescence, which shows up as a white, chalky residue on the stone surface.
Dry-laid patios also have a clear edge here: if part of the surface drops out of level, individual stones can be lifted and reset without replacing the whole patio.
Those trade-offs should appear plainly in the contractor’s quote.
5. Reviewing a Quote and Hiring a Contractor
Once you’ve looked at the price, use the quote to see exactly what’s included. A low number can look good at first glance, but if the scope is vague, that price may not hold up. Before you sign anything, check every line item.
What a quote should include
Ask for an itemized scope that spells out demolition, excavation depth, base material type and thickness, geotextile fabric, drainage and discharge path, edging, stone type and thickness, joint fill, cleanup, soil haul-away, permit responsibility, HOA approval paperwork if needed, and warranty terms. If a bid only says "install flagstone patio," pass on it.
Use this checklist to compare bids side by side.
| Item to Confirm in Writing | What to Look For | San Diego Note |
|---|---|---|
| Excavation Depth | Specified in inches | Inland clay vs. coastal soil |
| Base Material | Class II Road Base, compacted in 2" lifts | Per site conditions |
| Geotextile Fabric | Listed as a line item | Clay soil areas |
| Joint Fill | Polymeric sand specified | Dry-laid installs |
| Drainage | French drains or catch basins with named discharge point | Permit-dependent |
| Permit Responsibility | States who pulls permits and handles HOA approval paperwork | Building, City right-of-way, or Coastal Overlay |
| Warranty | Workmanship and material terms in writing | Confirm coverage scope |
| Cleanup & Haul-Away | Cubic yardage and disposal fees included | Soil export can add $5,000–$15,000+ |
Also ask for written approval on any material swap. That way, nothing gets changed without your sign-off.
Preconstruction checks
After the scope is nailed down, check the contractor and the site plan before the job starts. This is the part many homeowners rush through, and it can come back to bite them.
Verify the contractor’s active California CSLB license and proof of insurance, including general liability and workers’ compensation. Confirm the drainage plan and where water will discharge, since that choice can affect permit rules and a meaningful share of the total cost. Make sure the planned base depth fits your soil conditions. Check which edging and joint fill are part of the job. If access is tight, labor costs can go up. And if digging is part of the work, confirm the contractor will contact DigAlert at least two business days before the start date.
It’s also smart to ask for photos of the compacted base, drainage pipes, and utility lines before the stone goes down. Think of it as your record of what’s under the surface, because once the patio is finished, you can’t see the parts that matter most.
Key points for budgeting a San Diego flagstone patio
When the quote is in front of you, pay close attention to the items that shift the budget the most. The stone itself is only one piece of the cost. Site prep, drainage, and soil export are often the parts that make a quote come in higher than expected.
Installation method affects both upfront price and future repair costs. In San Diego's clay-heavy inland areas, base depth, drainage routing, and site access are often the line items that separate a realistic quote from one that grows after work begins.
This is the pattern the crews at United Turf & Pavers see most often on inland flagstone jobs: a homeowner budgets for the stone and labor, then gets surprised by a change order for extra base material once the crew hits expansive clay. Always leave room in your budget for site prep, drainage, and haul-away.
Flagstone sits at the higher end of patio material costs, which is where financing tends to close the gap. GreenSky's 0% APR plans work for a project paid off within the promo window, and Lyon Financial's fixed-rate loans cover a bigger stone-and-labor budget. Check payment options before finalizing the stone choice.
FAQs
How much should I budget beyond the stone itself?
Beyond the stone itself, you’ll also need to budget for the patio’s base and site prep. That’s where costs can climb fast.
Big-ticket items often include demolition, excavation, and debris hauling. Depending on how deep the work goes and what disposal costs look like in your area, that can add $5,000 to $15,000.
You may also need to pay for extra road base, drainage, utility trenching, and possible permit or engineering fees. These aren’t optional add-ons in many cases. They help keep the patio stable and up to code.
Is dry-laid flagstone better for my yard?
It depends on your yard and what matters most to you.
Dry-laid flagstone sits on a compacted base with sand instead of mortar. That setup lets the surface move a bit with shifting ground, which can help in San Diego’s clay and sandy soils.
It’s also simpler to fix. If one stone gets damaged, you can lift it out and replace it without tearing up the whole area.
On top of that, it gives you a classic, premium look and can stay cooler in the sun. The trade-off is cost. Natural stone often comes with a higher price tag, and it still needs regular upkeep, including sealing every two to three years.
What should I check in a contractor's quote?
Ask for a clear, itemized quote that spells out the key job details in writing. That should include installation depth, materials, warranty, site prep, soil export, landfill fees, and base depth.
If the quote includes trenching or retaining walls, have the contractor confirm the linear footage, drainage details, and height assumptions in writing too. This is one of those small steps that can save a big headache later.
You’ll also want to verify that the contractor has a valid CSLB license and insurance. And make sure you know who’s handling HOA submittals and permit applications before the job starts.