.webp)
.webp)

How to Install Artificial Turf on Slopes
August 3, 2026
Artificial turf on a slope lasts when you handle drainage, base depth, and anchoring before the turf goes down.
If your yard has a 2% to 5% slope, you can often use a simpler build. Once the grade moves into the 5% to 10% range, runoff, seam stress, and infill movement become a bigger issue. And if the slope is over 10%, the ground may need wall work, terracing, or other support before turf is even an option.
Here’s the short answer:
- Check the slope first with a string line and level
- Watch where water flows before digging
- Excavate deeper in clay soil than in sandy soil
- Compact the base in 2–3 inch lifts
- Use geotextile fabric between soil and base
- Add drainage at the bottom if runoff collects there
- Anchor edges and seams tighter on steeper grades
- Use enough infill to help hold the turf in place
- Call a licensed contractor if the slope is steep, unstable, or needs a wall
In San Diego, that matters even more. Some storms can drop 2–3 inches of rain in 24 hours, and clay-heavy soil can stay wet for 48–72 hours. That mix can lead to washout, pooling, and shifting if the slope was not built the right way. There is also a code point to keep in mind: ground near a home’s foundation should slope away at at least 5% for 10 feet.
A quick way to think about it: turf is the finish layer, not the fix. If the slope moves, holds water, or drains toward the house, those problems need to be handled first. The rest of the article walks through the build path, from grading and drainage to seaming, infill, and final checks.
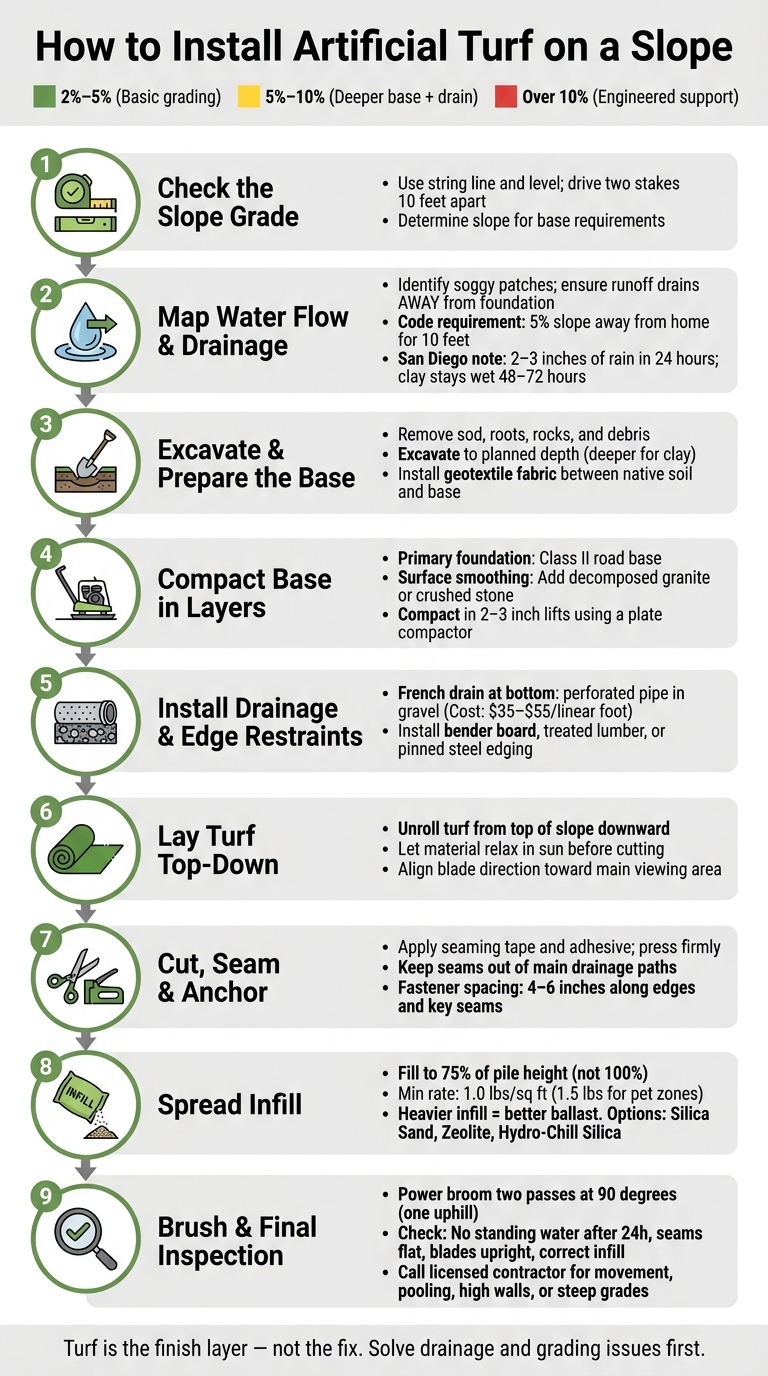
How to Install Artificial Turf on a Slope: Step-by-Step Guide
Artificial Grass Install with slopes. DIY how to.
sbb-itb-2b3b7d5
Quick Comparison
| Slope | What it usually needs | Main risk |
|---|---|---|
| 2%–5% | Basic grading, compacted base, standard edge anchoring | Surface runoff |
| 5%–10% | Deeper base, tighter anchors, drain planning | Infill drift and edge movement |
| Over 10% | Engineered support, drainage control, stronger restraints | Erosion, washout, slope failure |
1. Tools, Base Materials, and Drainage Components
Get your excavation, compaction, and drainage materials ready before you begin. The right setup depends on the slope grade, base depth, and anchoring plan from the previous section. A mild slope doesn't need the same base depth, drainage layout, or anchor spacing as a steep one.
Site Prep and Compaction Tools
Use shovels, grading rakes, wheelbarrows, and a sod cutter to clear out grass, roots, and debris. After the area is clean, compaction becomes one of the biggest differences between a flat install and a sloped one.
A plate compactor does most of the heavy work. But on a slope, you shouldn't compact the full base depth in one pass. Instead, compact in 2–3 inch lifts. Add one thin layer, compact it, then add the next. That step-by-step approach helps cut down on settling and washout.
Use stakes, a level, and string to check the grade before you place the base.
Base, Stabilization, and Drainage Materials
Class II road base is the standard foundation material for sloped turf installs. It compacts into a firm, load-bearing layer and still allows water to pass through. On top of that, a thin layer of decomposed granite (DG) or crushed stone helps smooth the surface for final grading.
Geotextile fabric sits between the native soil and the road base. It keeps the base from working its way down into the subgrade over time, which matters a lot on clay-heavy soils that move when wet. It also blocks weeds and helps keep the drainage layer clear.
Put a French drain where runoff tends to collect, which is often at the bottom of the slope. Install perforated pipe in gravel on a 1% slope and direct it to a storm drain, dry well, or lower discharge point. Installation usually costs $35–$55 per linear foot.
Materials Comparison Table for Sloped Turf Installations
| Material | Purpose | Stability | Drainage Benefit | Best Fit by Slope |
|---|---|---|---|---|
| Class II Road Base | Primary structural foundation | High | Moderate | All slopes; needed for heavy clay soils |
| Decomposed Granite (DG) | Finish grading and surface smoothing | Moderate | Good | Gentle to moderate slopes |
| Geotextile Fabric | Soil separation and stabilization | High | High; keeps drainage layers clear | All slopes; key on steep inclines |
| French Drain / Perforated Pipe | Subsurface water redirection | No structural role | Very high | Moderate to steep slopes with heavy runoff |
| ¾" Crushed Rock | Drainage surround for pipe systems | Moderate | Very high; maximum void space | Areas with concentrated runoff |
Next comes excavation, grading, and fabric installation.
2. Preparing the Slope Before Turf Goes Down
Use the slope plan from the previous section to build a stable base before turf goes down. Start with the slope map and drainage plan from the previous section, then mark the exact excavation limits.
Measure the Area and Check Water Flow
Before you order materials or start digging, measure the slope with care. A simple way to do this is the string line method: drive two stakes 10 feet apart, stretch a level string between them, and measure the vertical drop from the string to the ground at each stake.
After you know the grade, map how runoff moves. Walk the yard after running irrigation and watch for soggy patches that stay wet while the rest of the area dries. Those low spots will often overflow during a storm. Also check whether runoff heads toward a patio, the foundation, or another low area that can trap water. If it does, fix that before turf goes down.
Once the slope and runoff path are marked, move on to excavation and base buildup.
Excavate, Grade, and Compact the Base in Layers
With the measurements done, clear the area all the way - remove sod, roots, rocks, and debris. Excavate to the planned base depth, then fix high and low spots before you place aggregate. Build the base in 2–3 inch lifts, and compact each layer with a plate compactor before adding the next one. This layer-by-layer approach helps stop settling on a slope.
After the base is graded and compacted, separate it from the native soil and secure the perimeter.
Install Geotextile Fabric and Edge Restraints
Lay geotextile fabric over the subgrade before adding base material. Then install edge restraints around the perimeter, such as bender board, treated lumber headers, or pinned steel edging. Anchor the edge restraints tightly so the base and turf don’t creep downhill over time.
With the base, fabric, and edge restraints in place, the slope is ready for turf.
3. Laying, Seaming, Anchoring, and Infill on a Slope
With the base and edging set, it’s time to place the turf. Sloped installs need tighter fastening and more care at the finish line. Why? Because each part of this step helps prevent a common problem on hills: turf creep, seam lift, infill washout, and runoff damage.
Lay Turf From the Top Down and Align the Blade Direction
Unroll the turf from the top of the slope down. That setup gives you a small assist from gravity and helps pull the turf tight during layout. Let the material sit in the sun and relax before you cut or anchor it.
Blade direction matters too. Every piece should face the same way - usually toward the main viewing area.
Cut, Seam, and Anchor for a Long-Term Hold
Trim and place each section, then fold back the edges, apply seaming tape and adhesive, and press the seam down firmly. Try to keep seams out of main drainage paths or spots where runoff tends to gather. If water keeps hitting a seam, it can weaken the adhesive or lift the edge over time.
Use 4–6 inch fastener spacing along edges and key seams. On steeper slopes, shift seams away from runoff paths and tighten anchor spacing as needed. The goal is simple: keep water from turning a seam into a weak spot before you even add infill.
Infill Options Table and Final Brushing
On a slope, infill does more than support the blades. It also works as ballast. Heavier infill gives the turf more resistance against sliding or creeping downhill.
Fill to 75% of pile height. If you go to 100%, you bury the blades and create matting. If you stay under 75%, the backing doesn’t get enough support. Spread the infill in controlled passes based on the manufacturer’s specs. For standard residential use, the minimum infill rate is 1.0 lbs/sq ft. In pet-heavy areas, use at least 1.5 lbs/sq ft.
| Infill Material | Ballast Weight / Density | Drainage Performance | Heat Behavior | Best Use Case on Slopes |
|---|---|---|---|---|
| Silica Sand | 100 lbs/cu ft | Standard | 2.2°F cooling per lb/sq ft | Standard residential slopes; heavy ballast |
| Zeolite | 55 lbs/cu ft | High | 2.2°F cooling per lb/sq ft | Pet areas; adds odor control |
| Hydro-Chill Silica | 100 lbs/cu ft | High | High evaporative cooling | South-facing slopes and pet areas in hot climates |
| Crumb Rubber (SBR) | 68 lbs/cu ft | Standard | Heat retention; surface can exceed 150°F | Not recommended for slopes with barefoot or paw traffic |
After spreading the infill, use a power broom in two passes at 90-degree angles to lift the blades and work the infill deep into the pile. On a slope, make at least one pass uphill so the fibers stand up against the pull of the grade. Then do a visual check for wrinkles, loose seams, and any exposed base before moving on to final checks.
4. Final Checks and When to Hire a Licensed Contractor
Once the turf is laid, seamed, anchored, and brushed, do one last inspection before anyone starts using the area.
Start with drainage. Make sure the finished slope still drains away from structures and lines up with the original design. Then check the surface again after rain or irrigation. If water is still sitting there after 24 hours, that points to a drainage issue.
Next, walk the full area. Look closely at the seams, perimeter, and pile height. Seams should sit flat and stay bonded. Edges should feel secure with no lifting. And the blades should stay upright across the surface. Bare turf can heat up fast in direct sun, which is why infill should stay at a minimum of 1.0 lbs/sq ft.
| Final Check | What to Look For |
|---|---|
| Slope Grade | Matches design plan; drains away from structures |
| Compaction | Firm, even foundation with no dips or low spots |
| Standing Water | No pooling beyond 24 hours after rain or irrigation |
| Seams & Edges | Flat, bonded, no lifting at perimeter |
| Infill Depth | 75% fill; blades remain upright |
| Infill Rate | Minimum 1.0 lbs/sq ft (1.5 lbs/sq ft for pet zones) |
If the slope still shows movement, pooling, or edge lift, stop there and call a licensed contractor. The same goes for retaining walls over 3 feet, major grading, or drainage work. For steep grades, retaining walls, or drainage work, United Turf & Pavers (CA #1138157) handles turf installation and slope-related backyard remodeling in San Diego.
FAQs
How deep should the base be on a slope?
For a stable installation on a slope, aim for a combined base depth of at least 12 inches. That usually means a 4-inch aggregate base placed over an 8-inch subbase.
In the San Diego area, clay soils often call for deeper excavation and thicker base layers to help with drainage and long-term stability. Compact the base in lifts so the foundation stays firm and even.
What type of drainage is best for sloped turf?
For sloped artificial turf, the best drainage setup combines proper grading with subsurface drainage. In most cases, a steady 2% to 5% slope gives water a clear path to drain off on its own without washing out the area.
If you’re dealing with ongoing runoff or groundwater, French drains are usually the go-to fix. Pairing them with permeable hardscaping helps control both surface water and subsurface water, which cuts down on standing water and helps protect the turf base.
When should I hire a licensed contractor?
Hire a licensed contractor for any project that involves grading, drainage changes, or structural work like pergolas, outdoor kitchens, fire pits, and electrical or gas lines.
For sloped turf installations, it helps to bring in a pro. Base prep and drainage can get tricky fast, and small mistakes can turn into big headaches later. A licensed contractor, such as United Turf & Pavers, can help you meet local San Diego rules, handle permits, and provide insurance coverage.